
DIY Painted Air Dry Clay Bowls.
/
Painted Air dry Clay Bowls.
So, I think we all know by now how much I love making things out of air-dry clay. It's really easy to use and you can make so many different things with it (here are 6 of my favourites).
Today I thought we'd go back to basics and make the classic DIY clay bowl. There are a lot of different versions out there including these marbled ones, these cute little bunnies and my own ink stamped ones but today I'm going to show you how to make a smooth, hopefully wrinkle-free clay bowl you can decorate any way you like.
I know the last time I made these a few of you had trouble getting the clay not to wrinkle and bunch together so this time we're going to make the bowls by forming the clay to the outside of the bowl instead of the inside.
I found this to be a much easier way to get a smooth finish to the clay and hopefully you'll think so too.
As always if you have problems or any questions please pop them in the comments below and to Julie, if you're reading, who emailed me asking about using gloss varnishes with air dry clay hopefully this post answers your questions.
I tried replying several times but my email kept being sent back saying your address wasn't recognised. I'm really sorry about that. I've also linked to a few gloss varnish alternatives at the bottom of the post for those of you that don't want to go the diy route.

Supplies:
Polyurethane Gloss Varnish or your own diy clay craft tinted glaze.
The above links are affiliate links. This means that if you purchase through them I receive a small commission.
1. Knead your air dry clay until it is soft and easy to work with.

2. Roll the clay out to around 5 mm thick. Remember the thicker the clay the longer it takes to dry. If you find your clay getting stuck to your tabletop try rolling it out on to some greaseproof paper first.

3. Lay a bowl on top and cut around it using a knife or clay cutting tool. Don't worry if the edges look a little rough, you can sand them down later when the clay is dry.

4. Turn your bowl upside down and place your clay circle on top.

5. Gently press the clay down around the bowl. To begin with the clay will ripple up but don't worry it does flatten out.
All you need to do is cup your hands around the bowl and press down gently as you move your hands around the bowl. You want the clay to flatten out and not clump together so try to keep the pressure as even as possible.
If you're using a glass bowl as your mould take a look inside and check for any air bubbles or ripples. Apply a little extra pressure to smooth them out.

6. Use a little water to smooth out any imperfections and leave to dry.
7. After your clay has been drying for around 24 - 48 hours (depending on the humidity) and is half dry you need to remove it from the bowl as air dry clay tends to shrink as it dries.
If you leave the clay too long it can shrink onto your bowl and be practically impossible to remove without damaging the clay. You need your clay to be dry enough to hold its shape but wet enough to slide easily off your bowl.

8. Leave to dry for another 24 - 48 hours. You'll know when the clay is dry as it will turn white and matte.
If you're making clay bowls like these and pressing the clay into the inside of the bowl and not the outside the shrinking can actually help. The clay should come away from the inside of the bowl and pop out quite easily.

8. Sand away any rough edges.
9. Decorate your bowls.
For the first bowl, I built up three layers of my own diy pink tinted glaze and left the outside of the bowl matte. If you're interested in making your own diy glaze you can find the recipe here.
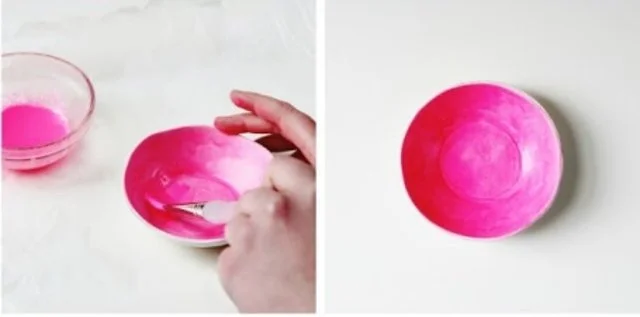
I painted the second bowl with some watered-down fluorescent pink acrylic paint.
The thinner the paint the more the brush strokes will show through which I like. I left a 1/2 cm white trim around the rim and sealed it with a coat of clear polyurethane gloss varnish.

For the third bowl, I used some more of the watered-down acrylic and let it drip down the sides. I didn't worry too much about any splatters or mistakes as I think it adds to the handmade nature of the bowl.

I applied a couple of layers of my diy pink tinted glaze and then when this had dried did the same on the bottom of the bowl.

