
DIY CLIPBOARD LOOM MINI WEAVING.
/
I stumbled across this pin last week, a mini weaving made using a clipboard as a loom. It's a photo from Rachel Denbow's Instagram account. If you've ever googled how to weave I'm sure you've come across one of her amazing weaving tutorials for A Beautiful Mess. Each one is fantastic and well worth checking out.
I scoured Rachel's blog but couldn't find anything showing how she did it. I did however find a tutorial Rachel wrote on A Beautiful Mess showing you how to make a woven necklace using a piece of cardboard as a loom. Even though it's not exactly the same, a shed rod isn't used to help separate the warp threads, the principles are the same and I was able to combine the two to come up with my own clipboard loom.
I've covered the basics below but if you want to see anything in more detail like how I made the tassels you can read my original Diy Woven Wall Hanging post where I used a stripped art canvas frame as a loom.

Supplies:
A clipboard,
wool, I love this nature 8 pack of wool from Lion. You get 8 x 10g balls of wool that's perfect for making mini weavings.
This 12 inch wool roving pack (the furry friends pack) is great for small projects as well,
Any other ribbon, trim or twine you want to use,
A fork,
A pair of scissors,
And a piece of dowel.
The above links are affiliate links. This means that if you purchase through them I receive a small commission.
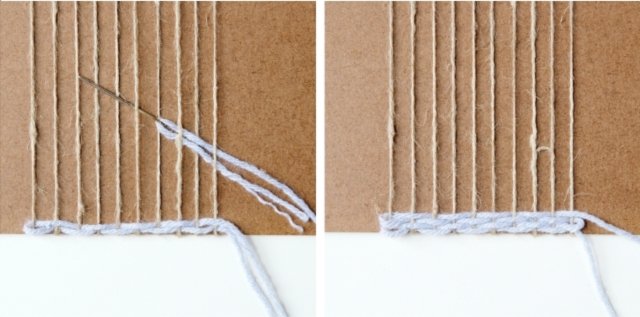
1. First we are going to make the warp. To do this wrap your twine around your clipboard. You want 10 rows on the front of your clipboard. Tie the 2 loose ends in a diagonal knot at the back of your clipboard.

To make your mini weaving wider all you need to do is add more rows but remember to add them in an even number so you can tie them off in pairs at the end. I'd also recommend using a twine or string that doesn't have any stretch to create your warp so your weaving will hold it's shape when it's removed from the clipboard.

2. To start the basic weave thread your chosen wool onto a tapestry needle and thread it under the 1st warp thread and over the 2nd, under the 3rd, over the 4th etc until you get to the end. Make sure not to pull your wool all the way through. You want to leave a tail of about 4 inches at the end. Don't worry about any loose ends at the moment as we'll be tidying them up later.
To stop your weaving getting tighter and tighter and ending up in an hourglass shape you can do something called the slanting technique. When you get to the end of a row pull the wool through on a slanted angle, use a fork to push down the wool at either end to make a hill and then push the hill down flat in the middle. Try not to pull the wool too tight. You can read more about it here.

3. Keep going with your basic weave until you're happy with it. I did 4 rows.
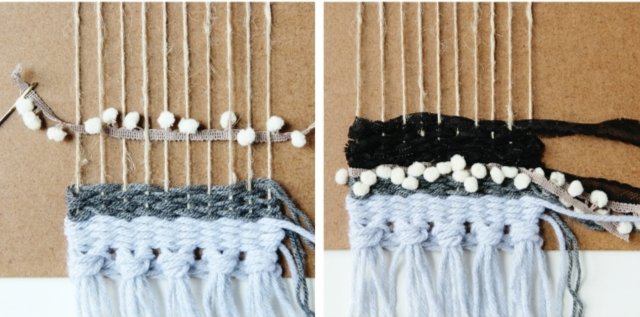
4. Keep weaving in different materials and textures until you reach the top of the clipboard. Make sure to leave tails at the beginning and end of each row.

I did a row of 5 tassels. You can see how I made them in more detail over on my Diy Woven Wall Hanging post. I doubled up the dark grey wool and did another 4 rows of basic weave. Next I added some pom pom trim and black lace ribbon. The mini pom poms can be a bit tricky, you may need to help them through as you weave. I did a couple of rows of the soumak stitch. You wrap the wool behind and around each warp thread instead of over or under. You can find a great tutorial for the soumak stitch over on A Beautiful Mess, scroll down to step 28. I carried on weaving in different textures and materials until I reached the top of the clipboard.
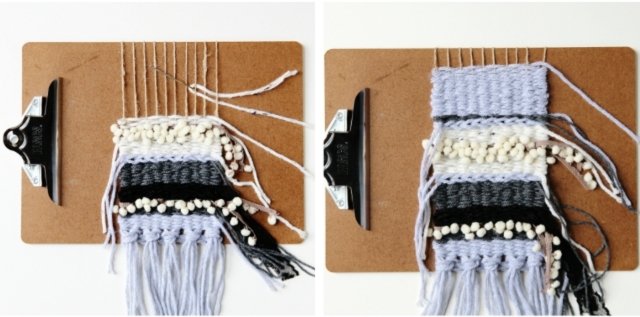
5. When you're happy with your weaving turn it over and cut through the warp threads about halfway up with a pair of scissors.

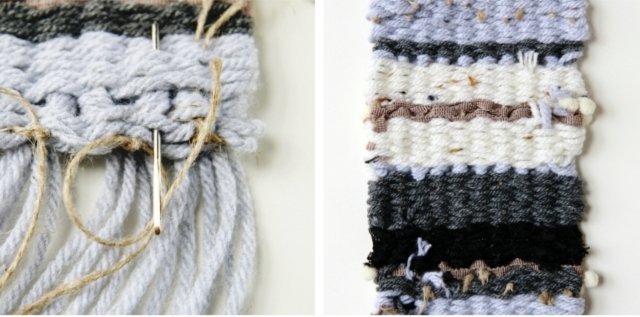
6. To secure your weaving and tidy up the loose ends tie each pair together in a double knot. Thread the ends onto a tapestry needle and pull them up through some of the stitches on the back. Trim away any excess. Tidy up all the loose tails at the end of the rows in the same way.
7. To attach your weaving to the dowel stitch through the top and tie the end tail to the dowel. Keep stitching and looping the wool over the dowel until you reach the end. Tie another double knot at the end to secure.

8. Tie some more wool or string to each side of the dowel and hang.

I've already made another two weavings using my clipboard loom. This weaving thing can get addictive. Next on my list, circular weaving. I love this diy woven hula hoop rug from Flax and Twine. So pretty.
Like this? You might like to check out my Diy Circular Woven Coasters.


