
Origami Christmas Trees with Origami Lucky Star Toppers
/Craft your way to a festive wonderland with these Easy Origami Christmas Trees adorned with adorable Origami Lucky Star Toppers! Perfect for a cosy holiday crafting session.

DIY Origami Christmas Trees.
I'm so excited to share this tutorial for these diy paper Christmas trees with you. They're such a quick and easy project and take practically no time at all.
Perfect for beginners and seasoned crafters alike, these simple folded paper trees are sure to add a touch of festive magic to your holiday decor. You could easily whip up a whole forest of them in an afternoon.
How great would they look lined up on top of the fireplace? Or as a table centrepiece? You could even thread them with string and replace the blu tack with beads and hang them from your tree.
Any ideas? What would you use them for?

Supplies:
Scrapbook paper (I used the Crate Paper Close Knit pad),
Several bowls or cups of different sizes to draw around or a circle cutter (I've got the Martha Stewart circle cutter on my Christmas list), each one needs to about an inch smaller than the last,
A Bone Folder,
Glue,
A pencil
And some blu tack/light weight modelling clay or a glue gun.
The above links are affiliate links. This means that if you purchase through them I receive a small commission.


How to make an Easy Origami Tree.
1. Trace and cut out 3 circles from your scrapbook paper.
I love using green origami paper for that authentic Christmas tree vibe, but feel free to mix it up with patterned or coloured paper if you're feeling adventurous!
You'll need 3 different sizes. I used a cereal bowl (4.5 inches in diameter) for the biggest one, a small bowl for the middle circle (3.5) and a ramekin (2.5) for the smallest.
2. Take a circle, fold it in half and crease using a bone folder.
3. Open your circle out again turn 90 degrees and fold it in half again.
Your circle should now to divided up into 4 sections.
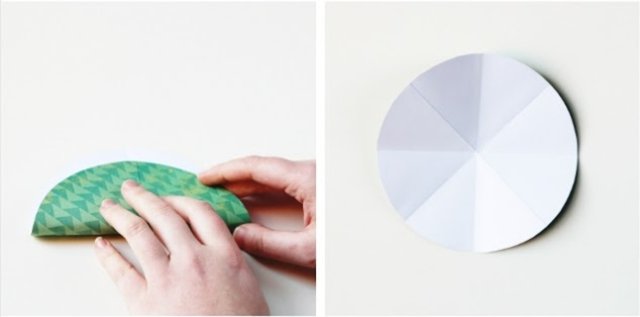
4. Repeat and fold these 4 sections in half again so you have 8 sections and then finally 16 sections.

5. Take your circle and fold it using an accordion fold.

6. Repeat for your 2 other circles. The smaller the circle, the harder it is to fold so make sure to take your time.
7. Use a small ball of blu tack or modelling clay to space out each layer of your paper tree.

8. Press each layer firmly to the blu tack below. Adjust each layer until you're happy with it.

How to make a mini Origami Star Tree Topper:
No Christmas tree is complete without a star on top, right? Let's make a quick Origami Lucky Star to add that perfect finishing touch.
1. Take your scrapbook paper and cut it into strips 1/2 inch wide and 12 inches long.
2. Take your paper strip and tie it into a loose knot. Try not to pull too hard as the paper will rip.

3. Pull it gently and flatten. You should now have a flat pentagon shape.
4. Take the short end and tuck it into the knot.

5. Start folding the long end around each side of your pentagon.
It should naturally follow in the right direction.

6. Keep going until you only have a small tailpiece left. Tuck that tail end in like you did at the beginning.

7. Take your flat star and use your fingernail to push in on each side. Your star should start to puff up.
8. Apply a small amount of glue to the bottom of your origami star and stick to the top of your tree.
Voilà! You're all done.


