
How To Make Your Own Custom Rubber Stamp
/Creating your own rubber stamps is a fantastic way to add a personal touch to your paper crafts. Check out the blog post for a step-by-step guide on how to carve your very own stamps.

This page contains affiliate links. This means that if you make a purchase after clicking a link I earn a small commission but it doesn’t cost you a penny extra!
DIY Custom Stamp.
Ever find yourself searching high and low for that perfect stamp, only to come up empty-handed? I know the struggle all too well. That's why I decided to take matters into my own hands and make my own stamps!
Now, I know what you're thinking – making a custom rubber stamp sounds complicated and expensive. But fear not, because this week I thought it would be fun to show you how easy it really is.
With a few simple printmaking tools, you can make something totally unique and add your own personal touch to cards, notebooks and even create your own gift wrap.
I'm going to show you which tools to use, how to transfer your design as well as some tips and tricks to get the best results.

DIY Stamp Carving.
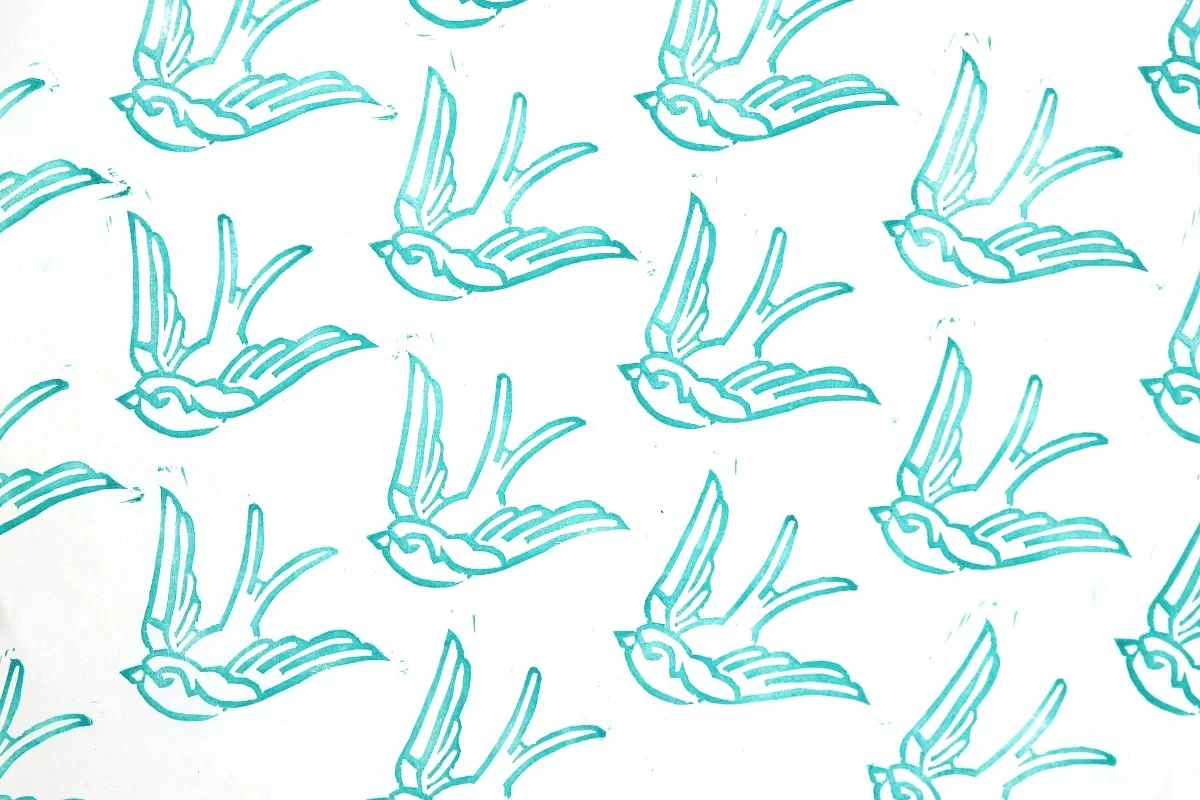
Making your own custom stamps can be a game changer. It's an easy way to create your own pattern or design to use in art journaling, scrapbooking, greeting cards, gift tags and wedding invitations.
You can even turn your own handwriting or doodle of your own design into a cute one-of-a-kind stamp. Although I would recommend keeping it simple, to begin with, especially for your first stamp.

Supplies:
Free Bird Template (download here)
Rubber Carving Block - Look for a soft carving block like Speedball.
Linoleum Carving Tool Set - Invest in a set of carving tools with different blade shapes and sizes. A V-gouge, U-gouge, and small carving knife are essential for various carving techniques.
A pencil
A Craft Knife
A Cutting Mat or a smooth, protected surface: Carving on a safe surface will protect your worktop as well as your tools and ensure smooth cuts.
An Ink Pad
And Paper.
If you don't want to buy the supplies separately you can buy a complete starter kit here.
Tips And Tricks.
Although daunting at first once you've grasped the basics, I think you'll find the whole process much easier than you originally thought. Read on for some tips to help you get the best results.
The carving tools can be sharp so watch your fingers. Carve away from yourself, it's safer and easier to do.
Make sure you're working on a flat surface.
Try not to press too hard as you carve. Make sure you're holding the tool at a shallow angle, it should glide along.
You'll get the cleanest edge by carving a long continuous line. Apply gentle, even pressure so the tool doesn't become buried in the rubber block. The deeper you cut the harder it is to control.
Take your time but remember it doesn't have to be perfect. Sometimes making something yourself is all about embracing those little imperfections.
Remember when carving stamps that whatever image your carve will stamp in reverse. So if you want to create a word or your own logo you must reverse or flip the image before you start carving. A simple design is always a good place to start.
To preserve your stamp, clean it gently with a damp cloth after each use. Store it in a cool, dry place, away from direct sunlight.
And finally, don't worry if your first few attempts aren't perfect – embrace the imperfections and keep experimenting. With time, you'll become a carving pro!

How To Carve A DIY Stamp.
1. Start by sketching your design on a piece of paper or download and print the bird template here.
Remember any words you choose need to be mirror images otherwise when you come to print your design it will be the wrong way around.
I've included mirror images of the bird in the template so you can decide which way you want it to face.
2. Once you're happy with your design use a pencil to colour on the back of wherever the design is.
3. Lay the design down and trace around it to transfer it to the rubber block.
4. Go over your design with a pencil to define the outline.

5. Use the v-shaped tool to carve the outside outline of your design first.
If you have trouble cutting out your design you can use a craft knife to trace around the outline.

6. Next cut away the fine details of your design.
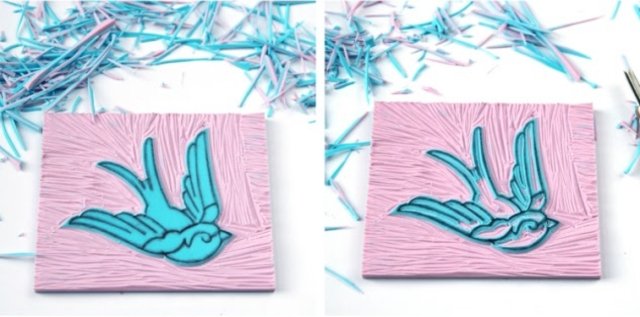
Remember whatever you cut away is the part that won't print (the negative space).
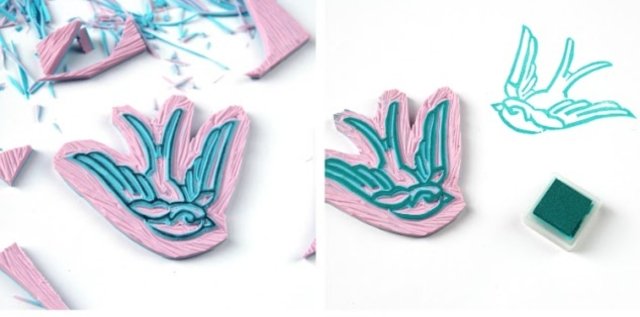
7. Use a craft knife to cut away the excess rubber.
8. Give your stamp a test run! Press your stamp onto an ink pad and then onto a scrap piece of paper to see how your design turns out.
If there are any areas that need adjustment, simply trim away the excess until you're satisfied with the result.

9. Ink up your finished design and get stamping!
And there you have it, you've just made your very own custom rubber stamp. Now you can use it to add a personal touch to your handmade cards, scrapbook pages, or any other paper crafting projects you have in mind.
Who needs store-bought stamps when you can create your own?


