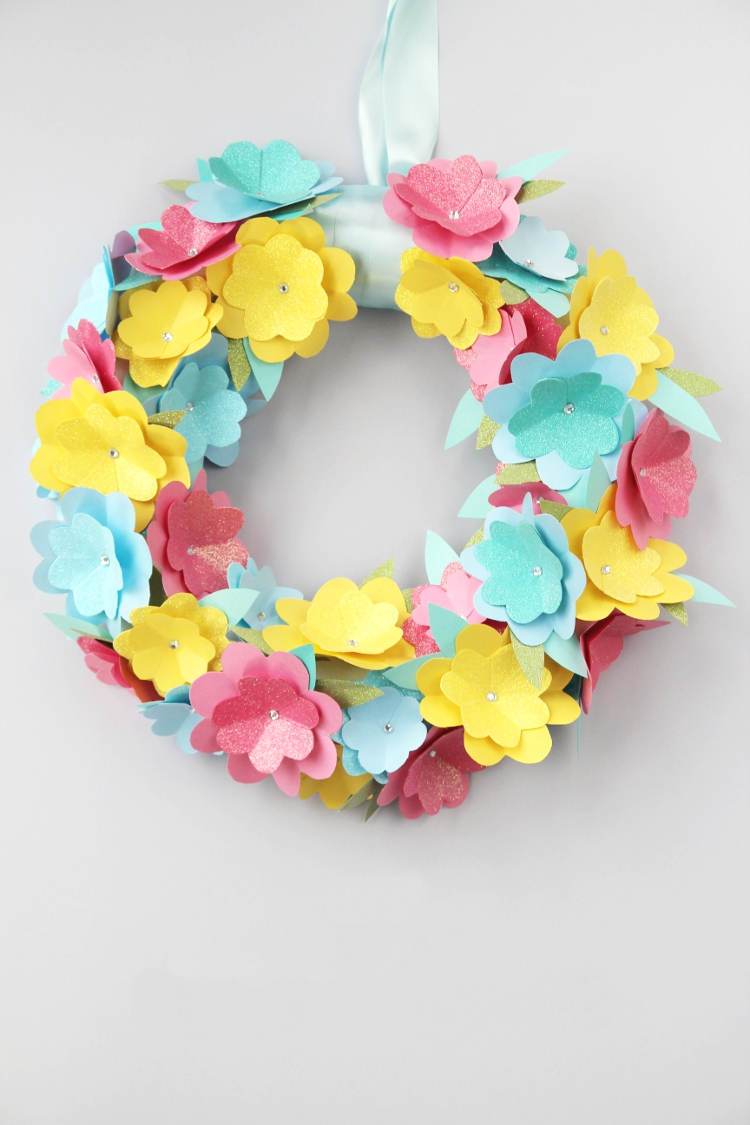
DIY Paper Flower Wreath
/This DIY Paper Flower Wreath is a cute project you can make in an afternoon. All you need is a few simple materials: pretty pastel paper for your flowers and a foam ring to attach them to.
Made using simple paper flowers that really are the easiest thing to make, it’s perfect for adding a pop of colour to your living room, dining room or bedroom.

This post contains some affiliate links for your convenience (which means if you make a purchase after clicking a link I will earn a small commission but it won’t cost you a penny extra)!
Paper Flower Wreath.
Spring is here and Summer is just around the corner or at least I hope it is. The weather is still a little hit and miss here, one minute the skies are bright and blue and the next it's grey and gloomy. Today I'm going to show you how to brighten up those last remaining gloomy days by creating this DIY spring paper flower wreath.
Making a wreath has been at the top of my crafting to-do list for a long time so I’m excited to finally be sharing one with you. It’s made using incredibly simple paper flowers and is a great way to use up all those little scraps of paper you’ve been holding on to but don’t know what to do with.
All you need is a couple of folds and a snip or two and you’ll be making these simple paper flowers in no time. You can scale them up or down depending on the look you want to achieve and can customise them to match any theme using whatever paper you have on hand.
I'm calling it a spring wreath because of the pretty pastel colours but you can give it a whole new look just by changing up the papers you use. I think it would make a fantastic Easter or Mother's Day decoration as is but switch up the colours for copper and gold or white and silver and you’ve got yourself a stylish fall or winter wreath.
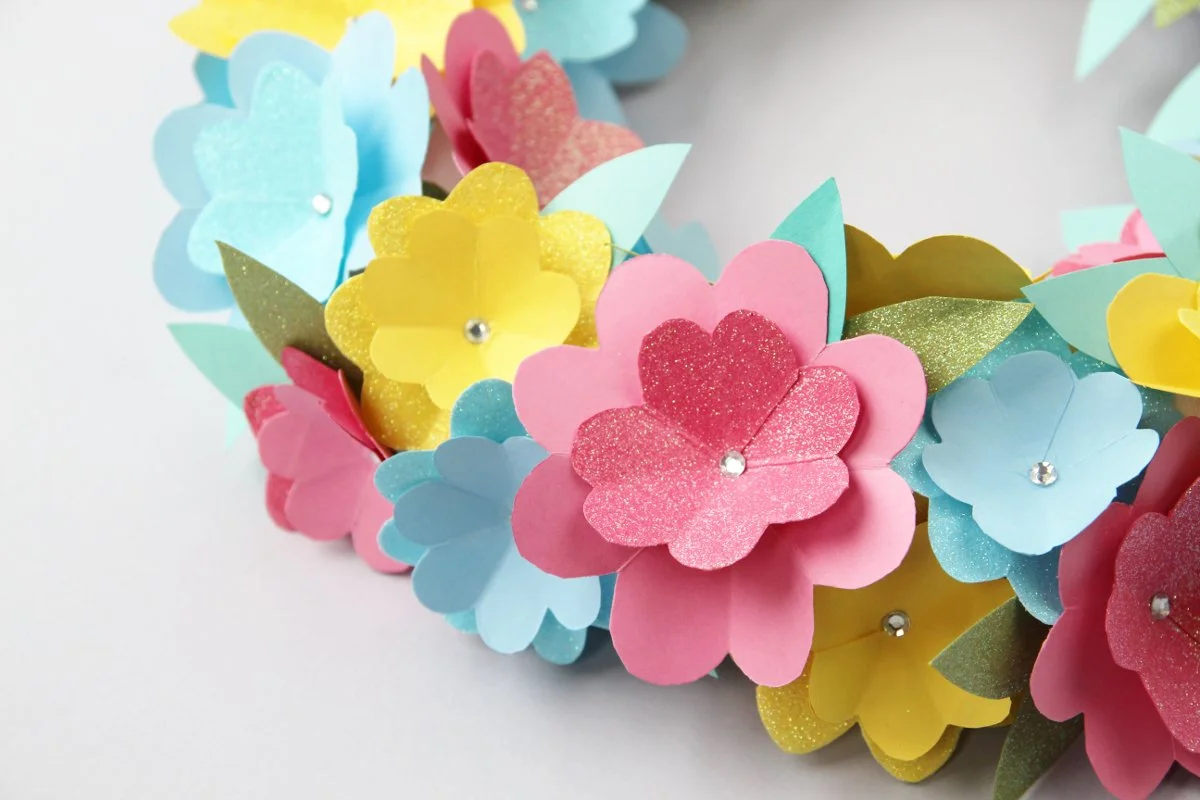
Adding a different material is a great way to add another dimension to your wreath. For this project, I used pastel paper with coordinating glitter paper to add a bit of sparkle and texture. If you’ve got an embossing machine or leftover textured wallpaper why not experiment and add that in as well.
What are you waiting for? Grab some colourful papers and get making!
Supplies:
Glitter cardstock or paper,
Polystyrene ring (I used a 20cm ring that cost around £3),
Ribbon (a metre was more than enough),
Dressmaking pins (you can use plain ones as I did and cover the top with stick-on gems or you can get pretty coloured ones like these),
Glue dots or other paper glue,
And a pair of scissors.
How To Make Easy Paper Flowers.
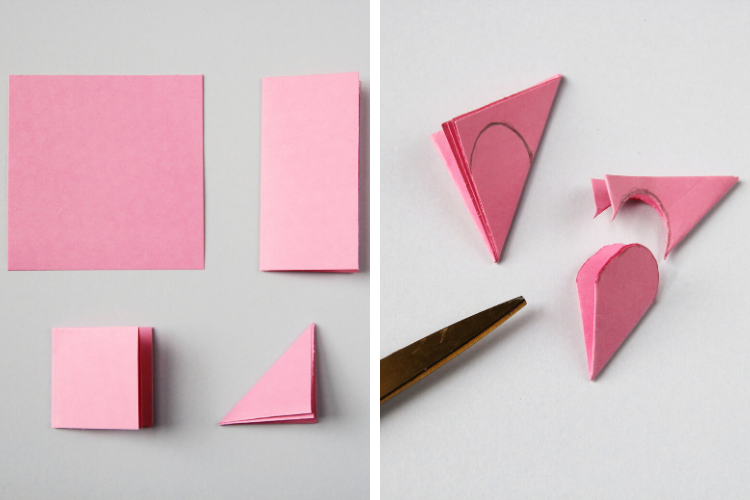
1. To make your simple paper flowers you need to start by cutting your card stock into squares.
For the large flowers (pictured above) I used a 3 inch square for the base and 2.5 inch square for the smaller glittery top layer. For the smaller flowers, I used a 2.5 inch square for the base and a 2 inch square for the top.
2. Take one of your squares and fold it in half and half again. You can use a bone folder to ensure a crisp fold. Next, you need to fold it half once more but this time fold along the diagonal to make a triangle.
3. To make the petals cut a teardrop shape out of the top of the folded triangle. You can do this by sketching out the shape first or by cutting it freehand.
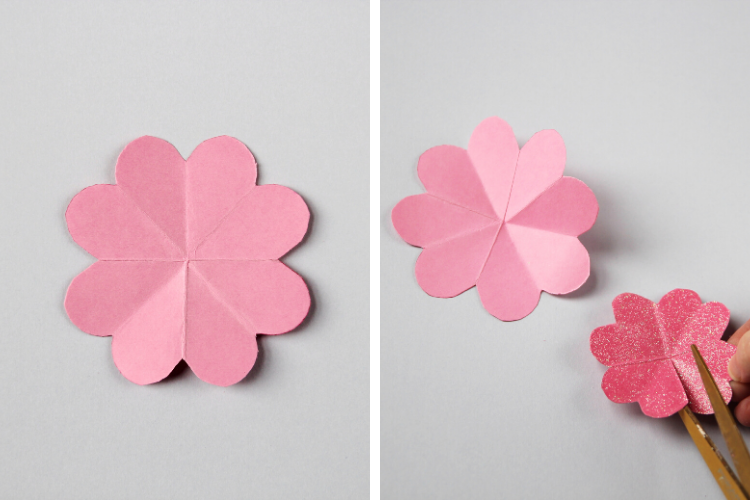
4. Open it up to reveal the base layer of your paper flower.
4. Do the same on a smaller piece of paper to make the inner part of the flower.
5. To give the inner part some more dimension cut along one of the folds.

5. Use a glue dot to stick one of the petals on top of the other.
6. Glue the 2 layers together to make your flower.

How To Put Together A Simple Paper Flower Wreath.
6. Next, you need to cut out some leaves. You can either cut them freehand like I did or make yourself a template to draw around instead. If you want you can cut your leaves out of both plain card stock and glittery paper to give your wreath an added dimension.
7. Position your flower and leaves and secure into place by pushing a pin through the centre.

8. Hide the pins by using stick-on gems to make your wreath look neat and tidy.
9. Keep pinning on your flowers and filling your wreath until all the styrofoam ring is covered. The styrofoam ring makes it easy to re-position your flowers. If you're not happy with the layout, simply remove the pin and adjust.

I found it worked best to overlap the large and small flowers and tried to make sure the different colours were evenly distributed.
10. To finish your wreath wrap some ribbon around the top and tie in a knot to hang.
I left a gap and tied my ribbon at the end but I think a better way of doing it would be to tie the ribbon at the beginning and then pin on your paper flowers. If you're worried about gaps showing through in between your paper flowers it's a good idea to wrap your entire styrofoam ring in ribbon first. To help my wreath hang better I found it also helped to secure the knot at the back of the wreath using some more pins.

And there you have it, a simple paper flower wreath perfect for Spring.
What do you think? Fun, right? These pretty pastel flowers would be great for Easter or a springtime party. What would you use them for?