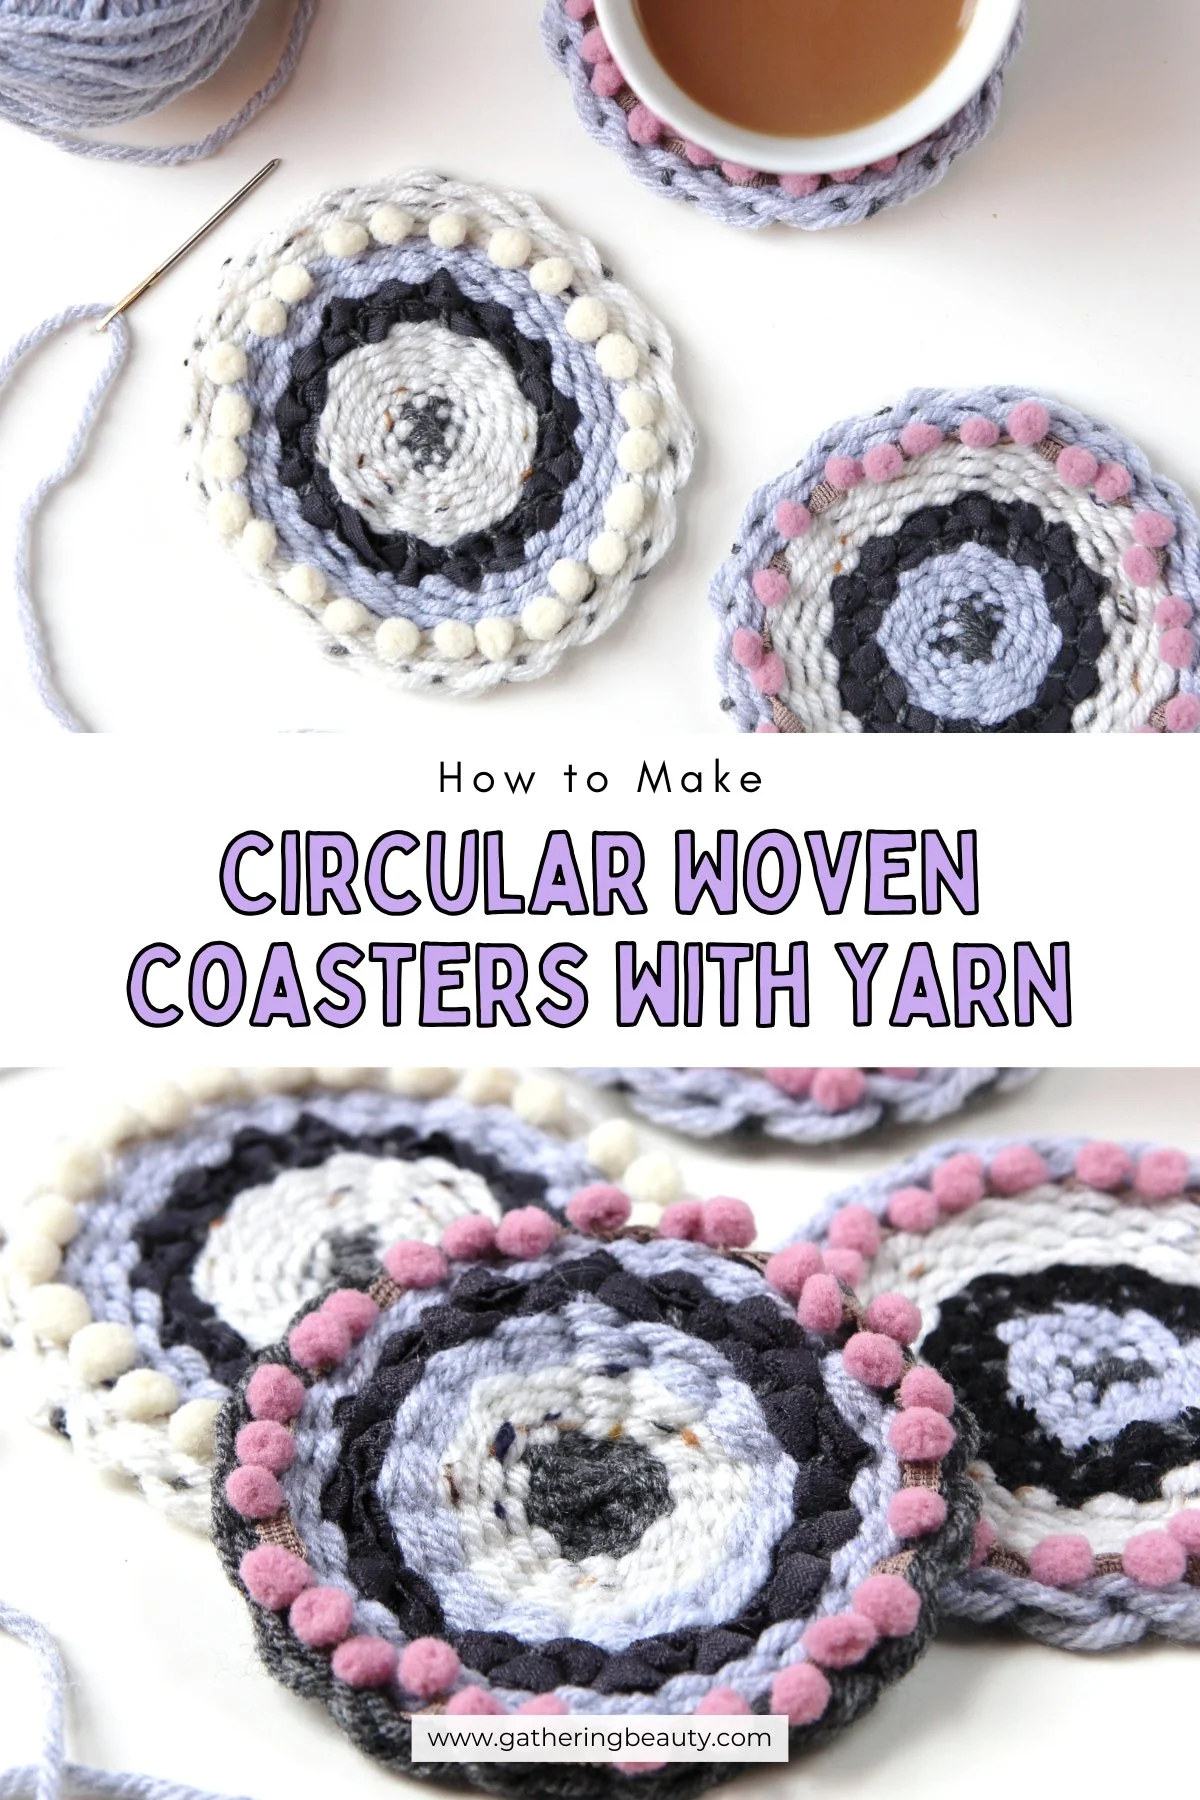
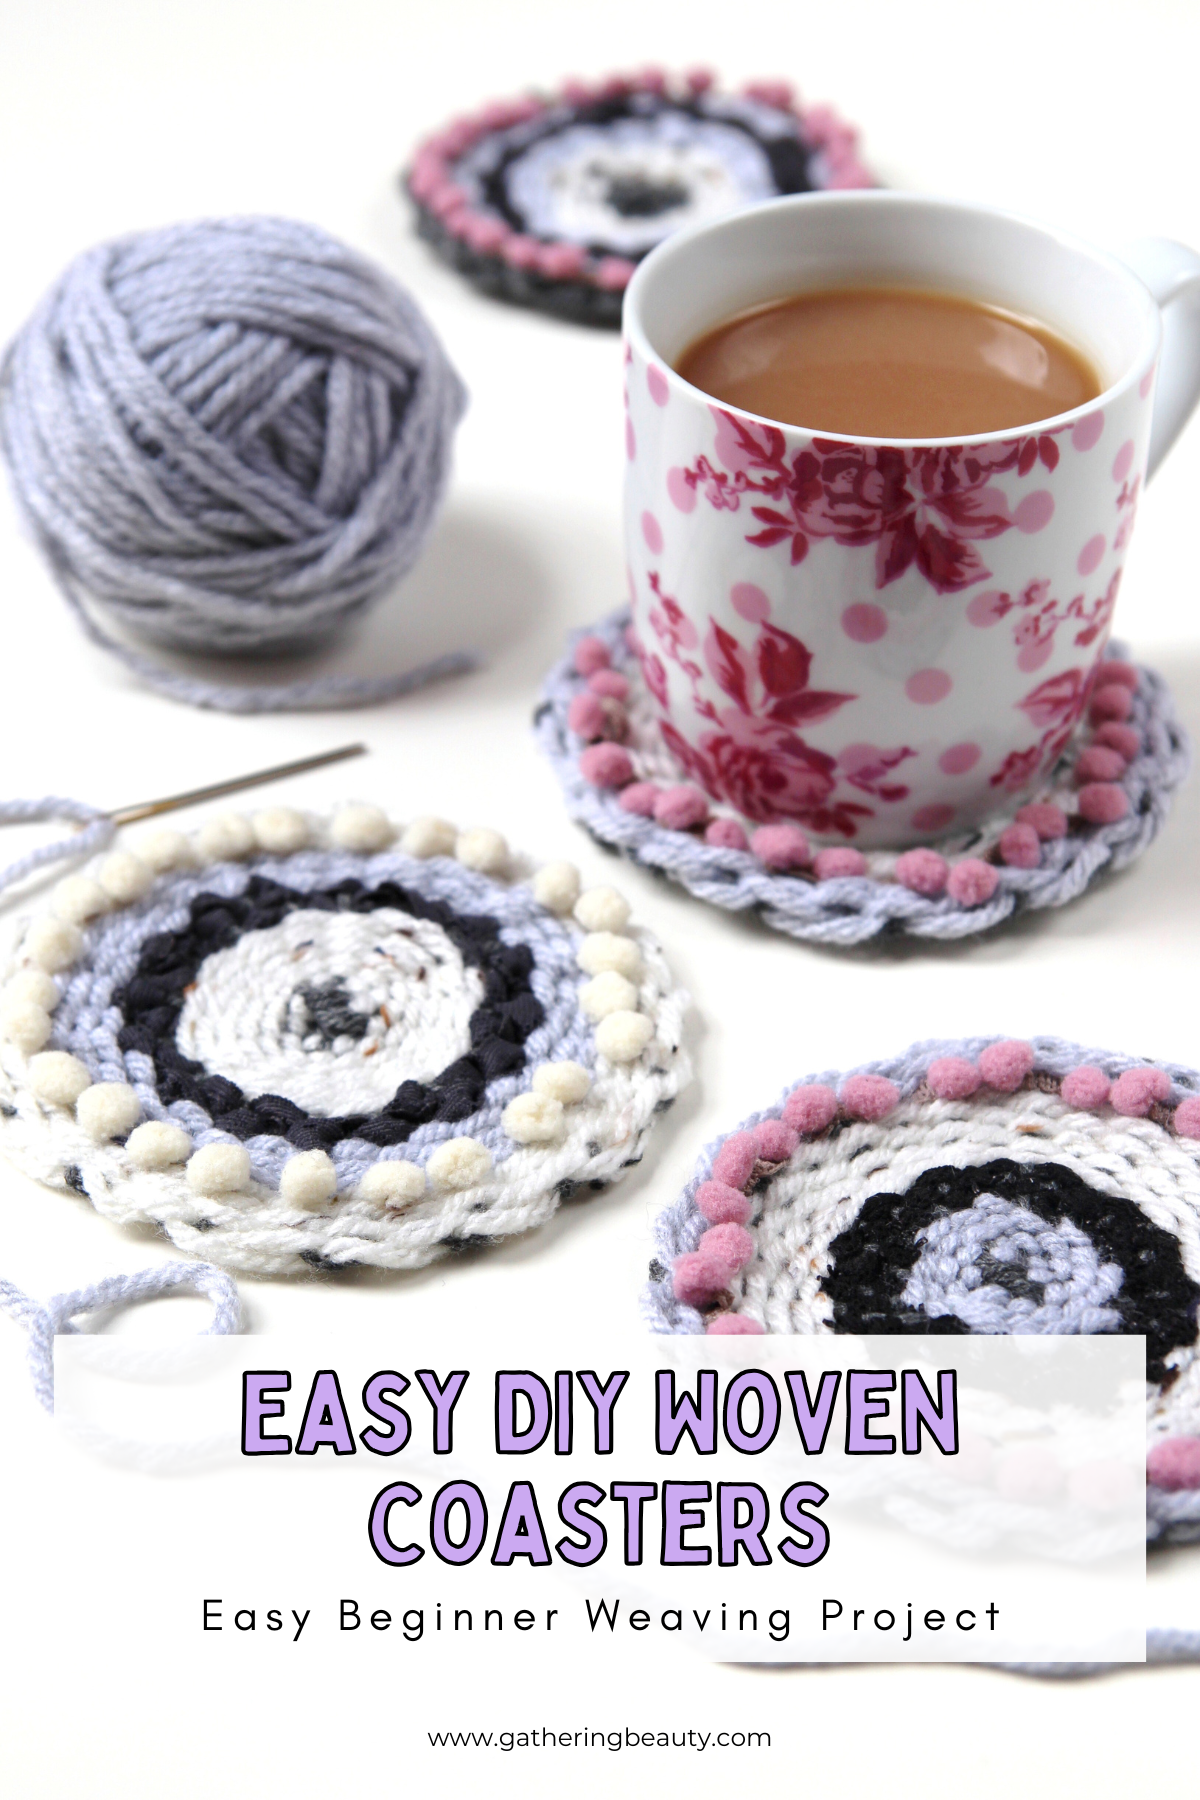
DIY Woven Coasters - Circular Weaving
/Learn how to make DIY circular woven coasters using yarn and a simple cardboard loom. This easy weaving tutorial shows you how to create colourful round coasters with wool, ribbon, and trim. Perfect for beginners and a great way to use leftover yarn.
The above links are affiliate links. This means that if you purchase through them, I receive a small commission.
Easy DIY Woven Coasters Using a Cardboard Loom.
If you’ve ever wanted to try weaving but don’t have a loom, this project is a great place to start. These DIY circular woven coasters are quick to make, beginner-friendly, and perfect for using up leftover yarn and trims from other craft projects.
Circular weaving is a fun twist on traditional loom projects. These little coasters come together quickly and are a great way to practise weaving techniques on a small scale.

They’re woven on a simple cardboard loom, making this an inexpensive craft you can try with materials you probably already have at home.
They also make lovely handmade gifts and once you’ve made one, you’ll probably want to make a whole set.

Supplies:
Card & Paper to make your template,
Yarn - I like these Lion Brand Bonbons packs.

Make the Loom Template.
1. Start by cutting two circles:
One from cardboard
One from paper
You can trace around a dinner plate to create a neat, even circle.
The cardboard circle will become your loom, while the paper circle will help you mark evenly spaced sections.

Divide the Circle.
To create the weaving spokes, you’ll need to divide your paper circle into 32 equal sections.
A quick way to do this is by folding:
1. Fold the paper circle in half.
2. Fold it in half again to create four sections.
3. Fold in half again to create eight sections.
4. Open it out and fold the 2 edges in to meet the middle crease; it should now be divided into 16 sections.

5. Open it out again and fold the bottom section in half to meet the first crease from the bottom.
6. Open it out and fold the bottom edge up to meet the 3rd crease from the bottom.
7. Rotate 180 degrees and repeat on the other side. Your paper should now be divided into 32 equal sections.

Cut the Loom Notches.
1. Unfold your paper circle and tape it to your card circle.
2. Using the creases as guides, cut small slits around the edge of the cardboard circle about ½ inch deep.
These notches will hold the warp threads in place while you weave.

Create the Warp.
1. Take a piece of yarn (you need to hold or tape the loose end of your wool to the back of your circle) and begin wrapping it around the cardboard loom.
2. Push it through one of the slits and wrap it around to the front. Push it through the opposite slit, around the back and back to the front.
3. Continue until all the notches are connected with yarn lines that meet in the middle.
4. Every time you pull the wool through to the front, move 1 slit to the left and 1 slit to the right as you pull it through to the back.
This creates the warp threads, which form the structure of your weaving.

5. When finished, secure the 2 loose ends of the yarn on the back of the cardboard.
You can either tape them down or tie them in a bow, as I did.
Start Weaving.
1. Thread a length of yarn onto a tapestry needle.
2. Tuck the loose end of your wool under your warp threads. I left mine a couple of inches long.

3. Begin weaving from the centre of the circle by going over two warp threads and under the next two, repeating the pattern all the way around until you reach the starting point.
As you continue weaving in a spiral, gently push the yarn toward the centre so the stitches sit close together.

4. When you reach the starting point of the next row, your weaving needs to be on and under the opposite warp threads.
5. You want to go under instead of over. To do this, go over 4 threads instead of 2 (see the top right square above) before carrying on weaving over and under every 2.
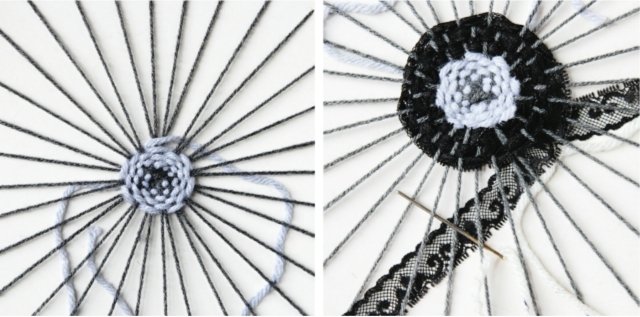
6. Each time you reach the starting point, you need to either go under or over 4 threads before beginning the next row.
7. Pull your thread gently to tighten it, but try not to tighten it too much.
If you pull your wool too tight, you'll warp the finished coaster (see photo after these steps for what not to do), and it won't lie flat.
8. When you reach the end of your current colour, you need to leave around a 4-inch tail at the end.
9. Tuck this tail under the warp threads as you did at the beginning. You'll be dealing with all the loose threads at the end.
10. Once the centre is complete, you can start experimenting with different materials.
Try weaving with:
Chunky wool
Ribbon
Pom-pom trim
Different coloured yarns
Switching materials every few rows will give your coaster an interesting texture and pattern.

11. When you've woven a couple of inches out from the centre, you can start weaving over and under every warp thread instead of every 2.
This means when you begin a new row, you need to weave over or under 2 threads instead of 4.

12. Carry on weaving.
13. When it comes to adding the mini pom pom trim, make sure to use a mug as a guide.
It's no good adding the trim only to find out later you haven't left enough space for a mug to sit.

Finish the Coaster.
1. When you're happy with your circular weaving, turn it over and cut 2 threads at a time and knot them together to secure the weaving.

2. Keep going until you have knotted all the warp threads in pairs.
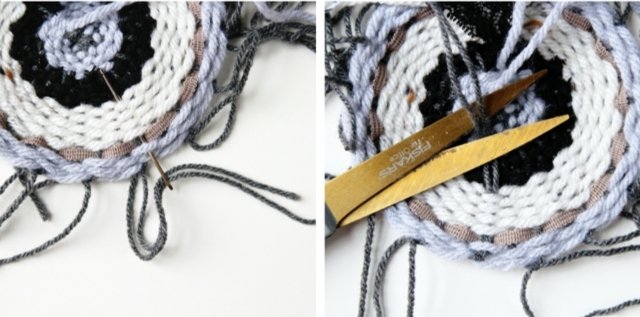
3. Flip your coaster over and thread the knotted loose ends onto a tapestry needle.
4. Thread the loose yarn under at least 4 stitches on the back of your weaving.
5. Trim away any excess.
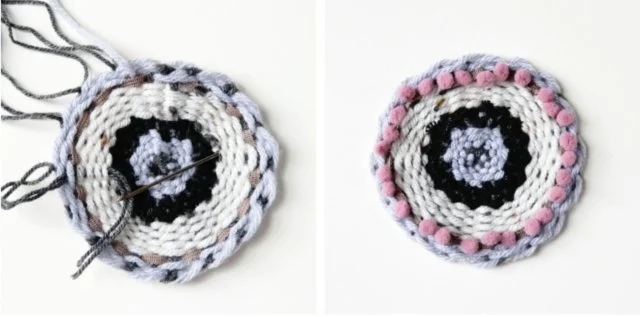
6. Do the same for any loose yarn where you changed colour or trim.
7. Once all the ends are tied off, your coaster is ready to use.

Tips & Tricks:
A couple of pointers (so you don't make the same mistakes I did).
To begin with, I found circular weaving a bit tricky. As you can see from my first attempt above, I struggled to find the correct tension as I tightened my yarn.
I didn't realise anything had even gone wrong until I started cutting and tying the warp threads together and my weaving began to curl.
The best way I've seen it described is to pull your yarn until it fits snugly rather than tight, and try to resist pulling it as hard as you can.
I kept forgetting to go over or under an extra warp thread every time I reached the starting point. If you do this, all you need to do is go back and reverse your steps.
As you get to the end of your cardboard circle, it can get harder and harder to weave. I found it was easier to make sure I had plenty of room left between the edge of my weaving and the cardboard rather than weave close to the edge.
I used a dinner plate to make my template, as this seemed to leave a good amount of space at the edges. This is something to bear in mind, depending on the size of the weaving you want to make.
If you wanted to make a circular weaving as a placemat or rug, you would need a much larger template.