
Watercolour Clay Christmas Decorations
/Looking for DIY Clay Ornaments to make this holiday season? Try these gorgeous watercolour-style air-dry clay ornaments. Use cookie cutters and air-dry clay to create different shapes, then finish them with acrylic paint for a beautiful watercolour effect.

This page contains affiliate links. This means that if you make a purchase after clicking a link I earn a small commission but it doesn’t cost you a penny extra!
Watercolour Air Dry Clay Christmas Ornaments.
Christmas ornaments are always so fun to make. This year, I decided to make a faux glazed clay version using watercolour paints and my favourite air dry clay.
The faux glaze effect is really easy to achieve. All you need are some watercolour paints and a clear varnish. And although the drying time between layers can be a little time-consuming, I think they're worth the effort.
Related: Clay Christmas Ornament Ideas

Homemade Christmas Ornaments.
I love air dry clay crafts because they use inexpensive materials and are simple enough for younger kids while still looking beautiful and polished for adults.
You can create different shapes such as a Christmas tree, candy cane, stars, bells, and more all depending on what cookie cutter shapes you can find. And easily customise them in any colour or style you like.
They're a great way to make to make a keepsake for family members or even as personalised gift tags. And such a fun project that the whole family can get involved with.

Supplies:
A Rolling Pin,
Christmas Cookie Cutters (I got mine from TK Maxx but I found some similar sets here),
Stamps (I used this set here),
Cocktail Sticks,
Sandpaper,
A Paintbrush,
And some Bakers Twine or Ribbon.

How to make Air Dry Clay Christmas Decorations:
1. Knead the air dry clay until it is soft and pliable.
2. Roll the clay out to around 3mm thick.
If you find the clay is sticking to your work surface, you can try rolling the clay out onto some parchment paper or a silicon mat first.
3. Press the chosen stamps into the clay (I used these stamps).

4. Use a cookie cutter to cut out the shape of your decorations.
5. Peel the excess clay away.
6. Use a cocktail stick or a small straw to make a hole in the top of the ornament.
7. Leave to dry. The air dry clay will harden by itself, there's no need to bake in the oven.
The Das air dry clay I like to use takes 24 hours to dry but I find it takes closer to 72 hours (3 days), especially in Winter when it's wet and cold, so make sure to allow plenty of drying time.
If you find your clay decorations starting to curl up as they dry, it helps to flip them over halfway through the drying process.
The clay dries a lot quicker when the air can get to both sides at the same time so I like to dry my clay on baking cooling trays.
You'll know when the clay is dry as it changes from a pale grey colour to a matte white.

8. When your clay is dry, sand away any rough edges using some fine sandpaper.
9. To decorate the clay with a faux glaze look, start by mixing a thin, pale watercolour base. This is the part where you can get creative. I used different shades of green for the trees but you could make them any colour you like.
You want to apply the lighter colour first and then build up the darker colours on top. The paint will sink and pool into the indentations left by the stamp.

10. Build up the colours layer by layer and leave the clay to dry in between each layer.
I found the watercolour glaze effect worked best on the clay that had the added stamped texture.
You can use a hair dryer or heat gun to help speed up the process.

11. When the decorations are totally dry you can glaze them.

I used a clear craft varnish to create a glossy faux glazed ceramic finish.
You can find more information on how to seal air dry clay here.

12. When dry, thread some bakers twine or ribbon through the hole and hang.

Air Dry Clay Candy Cane Ornaments.
1. To make the candy cane decorations, roll out some clay and score lines using a wooden lolly stick.
2. Cut them out using a candy cane cookie cutter.

3. Peel away the excess clay and use a cocktail stick or a small straw to make a hole in the top of the ornament.
4. Leave to dry and sand away any rough edges.

5. Paint and seal to finish.
I used an orangey-red for the base and a deeper cherry red on top.
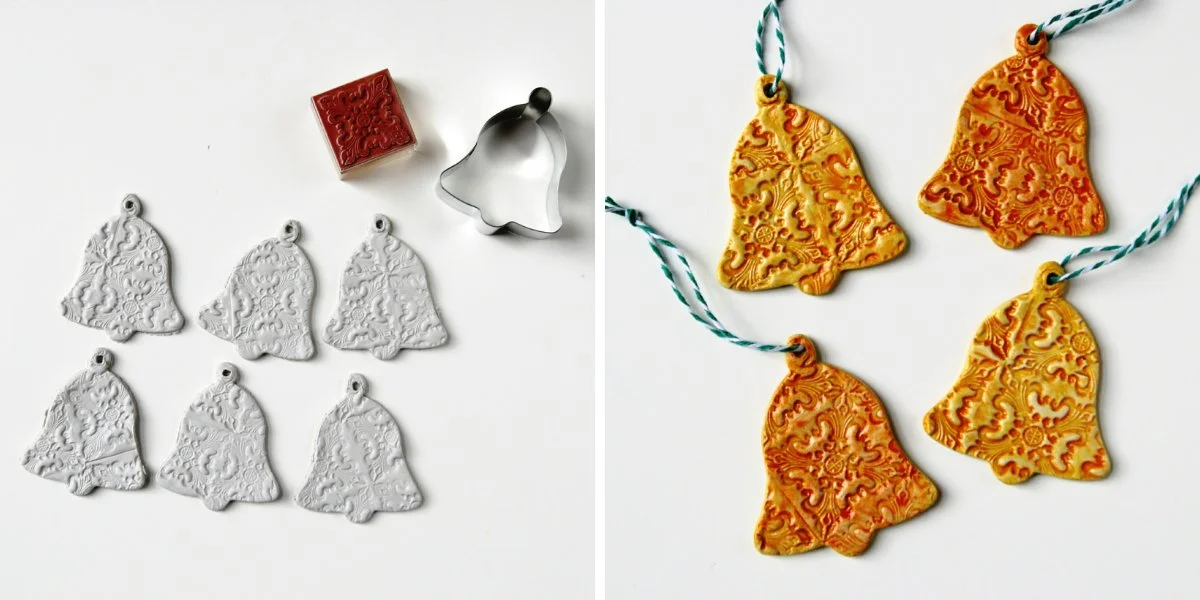
The bells were made in the same way as the trees but using a different stamp from the set. A dark orange was applied over a pale golden yellow before glazing.

To make the stars, use a cocktail stick to make the dotted line around the edge and a watery, inky blue to give them some colour.


