
ORIGAMI RECTANGLE BOX WITH LID.
/Who doesn’t love a special treat, especially when it’s gifted in a cute handmade box? This Rectangular Origami Box is easy to make and adds such a lovely touch to your handmade gifts or sweets.
Follow the simple step by step instructions and transform a simple piece of paper into a pretty and practical origami box.

This page contains some affiliate links. This means that if you make a purchase after clicking a link I earn a small commission but it doesn’t cost you a penny extra!
This cute little origami rectangle box is a super simple way to wrap a gift. All you need is some paper and a paper trimmer. They’re quick to make and are a fantastic last-minute DIY gift box solution.
Origami Gift Box.
There are so many ways you can make a cute little DIY gift box but one of my absolute favourites are still these traditional square (masa) origami gift boxes? I’ve made them countless times over the last few years and have used them as desk storage pots, snack bowls as well as gift boxes.
This rectangular box is based on the square masa box as is just as easy to make. It’s a great one for beginners as it’s relatively simple to make.
They’re a great way to add a personal touch to a gift for friends or family. Use different coloured and patterned paper to make all sorts of cute and inexpensive boxes for your homemade gifts. Any excuse to buy more craft supplies, right?
These clever origami boxes are perfect for any small gifts you may be thinking of giving this Holiday season. A fantastic last-minute DIY gift box solution.
Follow along with our step by step instructions and soon you will be folding these cute little boxes in no time at all. Knowing how to make an easy gift box in a couple of minutes can be a lifesaver when you're stuck in a pinch. Read on to see how all your last-minute gift-giving worries can be solved.
Supplies:
I like to use scrapbooking paper for my origami boxes. I find that the paper is thick enough to make a sturdy box but not too thick (like card) that folding becomes too difficult.
Sadly the paper I used is no longer available but can check out the rest of the American Crafts range for more pretty papers.
Trim your paper to size. For the lid I used an 8 x 8 inch piece of paper and for the base a piece measuring 7.5 x 7.5 inches.
How to make an Easy Origami Box - Rectangle.
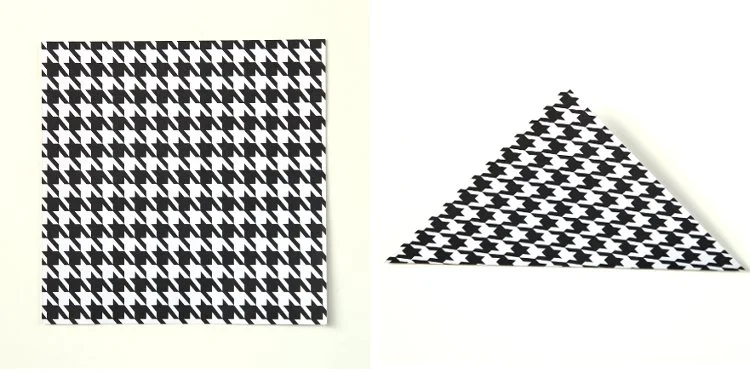
1. Cut your paper to size.
2. Fold your paper in half across the diagonal, unfold and fold again on the opposite diagonal.
3. Open your paper out and fold the top and bottom corners into the center point.
4. Open back out and fold the same corners in again but this time to the crease you created in the previous step.

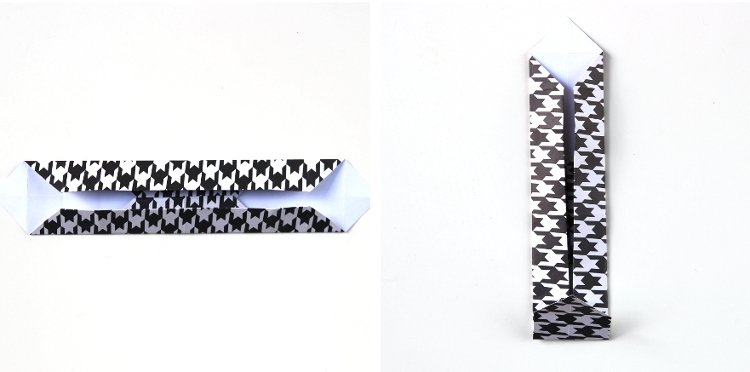
5. Next, fold the bottom and top edges into the middle. You should now have 2 diamond shapes on each side.

6. Take the diamond shapes and fold them in half to make 2 triangles on either side. You do this by taking the corners and folding them in to meet where the previous folds touch.

7. Rotate 90 degrees and fold the bottom and top edges in to meet the point of the triangle.
8. Unfold so your paper resembles step 5 again. Fold the bottom and top edges in again to meet in the middle.

9. When you look at your paper you should see 3 folds going across the top and bottom. Refold along each of these creases as it will help in the next step.
10. Open back out to step 5. Lift up the sides and as the corners fold in, press and crease them to make small triangles.
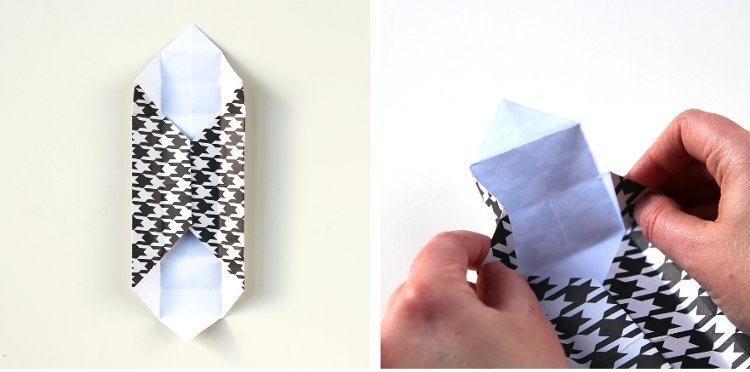
11. Fold the top over and press down. In most cases the base stays flat but if you have any trouble with the pointed flaps sticking up use a little glue or double-sided sticky tape to secure them.

12. Repeat on the other side and voila, you have half of a rectangular origami box.

To make the base repeat the above steps but this time make your paper 1/2 an inch smaller. So if your lid is 6 x 6 make your base 5.5 x 5.5.
An 8 x 8 inch piece of paper will make a finished box measuring 5 x 2.25 inches and 1 inch tall.
** You can purchase an INEXPENSIVE AD-FREE PDF of this tutorial here - this beautifully formatted PDF includes step-by-step pictures and is a total of 8 pages including the cover page.
This tutorial is also available in the Easy Origami Projects eBook which includes 20 beautiful origami crafts **

Of course, you don't have to use them as gift boxes. You could use the half boxes to store all sorts of bits of pieces on your desk like washi tape, paperclips or maybe even a few sweets. You could even use them as drawer organisers using a combination of the square origami boxes and these rectangular ones.
More Origami Gift Boxes:

Happy folding. Don't forget to let me know if you make any of these boxes. I'd love to know what you use them for.

