
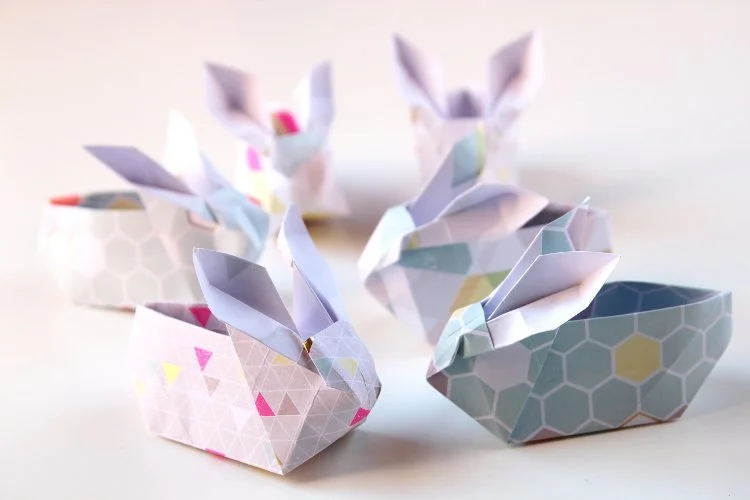
DIY ORIGAMI EASTER BUNNY BASKETS.
/Looking for a cute origami bunny? Learn how to make these Easter Origami Bunny Baskets. These cute paper bunnies make the perfect table setting. Fill with chocolate eggs and scatter across the table for a sweet treat for your guests.

This page contains affiliate links. This means that if you make a purchase after clicking a link I earn a small commission but it doesn’t cost you a penny extra!
Origami Bunny.
Easter is sneaking up fast and I've got the cutest Easter Origami craft project to show you, DIY Origami Bunny Baskets. These adorable origami rabbits would look lovely on a table filled with chocolate eggs. A must-have decoration for any Easter table this Spring.
I’m not going to lie, these origami bunnies can be a bit tricky. But don’t worry, I’ve made a video tutorial as well as step by step photos and instructions.
If you’re looking for an easier bunny rabbit or maybe something to make with the kids you might want to check out these blow-up origami Easter bunny rabbits. They’re made using a waterbomb base and are a much simpler model.
I love origami, particularly easy origami. It’s so clever how a single piece of paper can be turned into something completely different with a few clever folds. But sometimes it’s good to have more of a challenge.
There's a couple of tricky parts that were difficult to show in photos so make sure to check out the video if you have any trouble. I recommend making a practice bunny with some plain paper first or using a page out of an old magazine.
I often make mistakes the first couple of times I attempt a new origami model so scrap paper is always a good idea. There’s no use wasting your pretty patterned paper on your practice goes.
Materials:
I used the 12x12 Papermania Geometric Neon paper pack that is sadly no longer available but I think this Papermania Freshly Cut Flowers paper pack is a good alternative. Pretty pastels are always the perfect choice for Easter, don’t you think?

Want to download DIY Origami Easter Bunny Baskets to keep? Head on over to the shop to buy the pdf or only £2.
How to make Origami Easter Bunny Baskets:
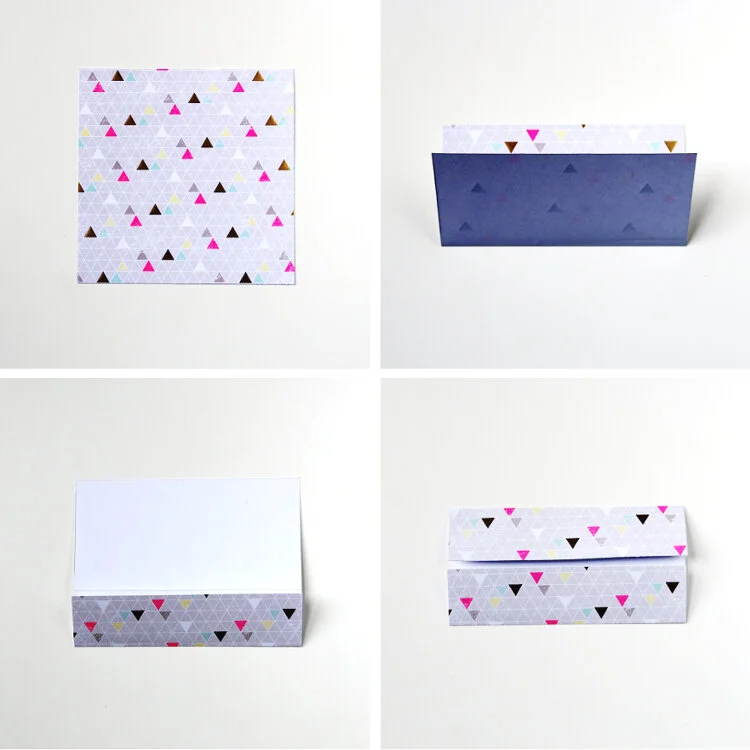
1. Take a 6 x 6-inch square and lay it flat pattern side up.
Folding it this way will mean your bunny basket is patterned on the outside and plain on the inside. If you want it to be the other way around just reverse the steps.
2. Fold it in half with the pattern on the inside.
3. Open the paper out again and flip it over so the plain side is facing up. Fold the bottom of the paper up to meet the centre crease.
4. Repeat and fold the top of the paper down to meet the centre. Open your paper back out. It will now be divided into quarters.
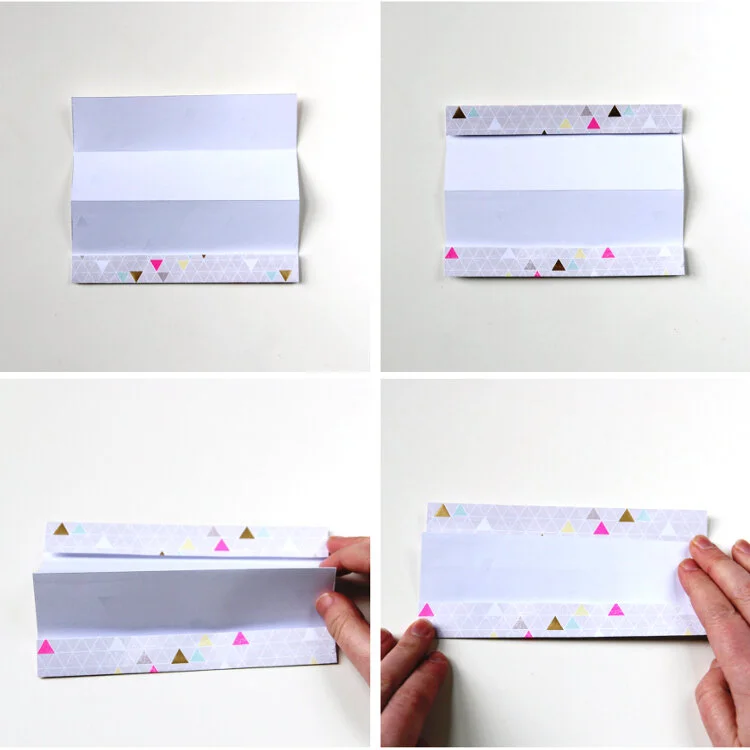
5. Fold the bottom of the paper up to meet the third crease from the top.
6. Fold the top of the paper down to meet the first crease.
7. Pinch and lift the centre fold towards you.
8. Fold the center crease up to meet the bottom edge of the paper you just folded.

9. Rotate 180 degrees and repeat for the other side. Open your paper out, it should now be divided into 8 equal sections.
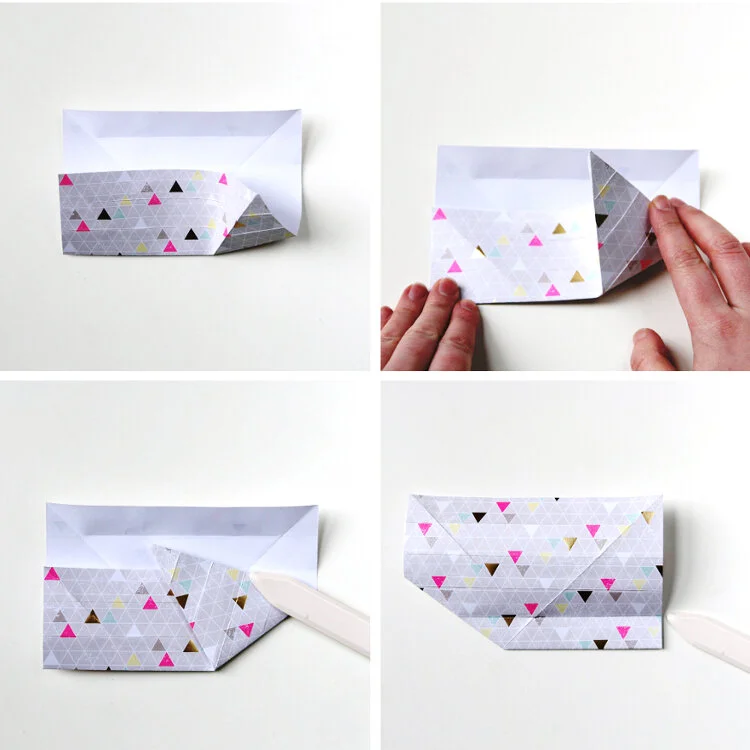
10. Fold your square in half across the diagonal.
11. Open your paper out, rotate 90 degrees and fold across the other diagonal.
11. To begin to form the bunny shape open your paper out again and fold the bottom edge up to meet the 2nd crease down from the top.
12. Open your paper back out again and rotate so the creases lie horizontally. Fold the bottom edge up to meet the second crease down from the top.
13. To make the head of your bunny take the bottom right corner.
14. Fold towards the center to make an upside down triangle.
15. You should be able to see three creases (marked with the bone folder above). The third crease needs to line up with the diagonal fold. The point will be the tip of the ear.
16. Flip your paper over. You need to find the first crease from the bottom, marked with a bone folder above.

17. Fold down along this crease and then fold it back on itself keeping this fold in line with the bottom edge.
18. Fold the bottom left corner up to make another triangle and the side of the head. Line up with the tip of the ear on the other side and press flat.
19. From the back it should look like a 'W' shape.

20. Fold along the crease at the front of the bunny head. Open it out and fold back the other way as well. Unfold again.
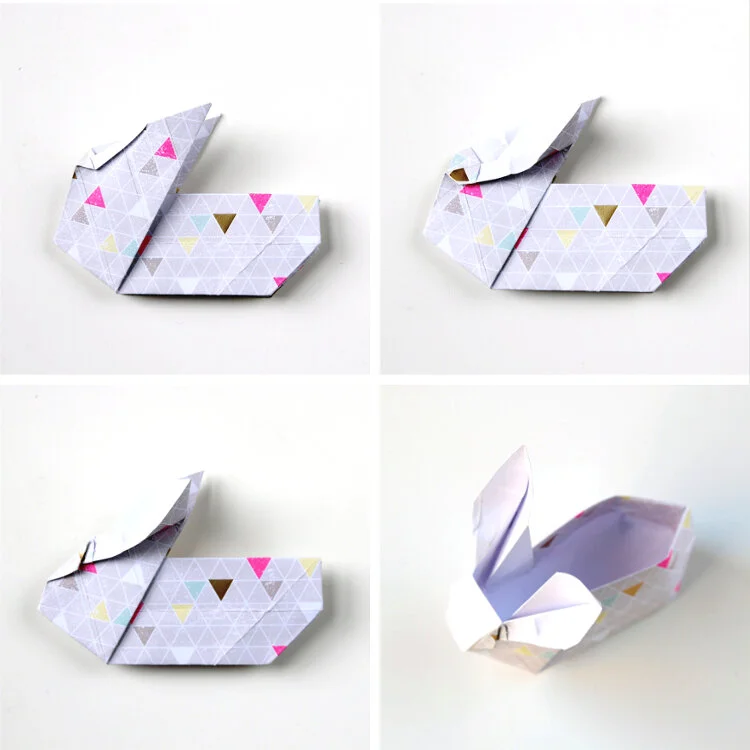
21. Take the back bottom corner and fold it up to meet the 1st crease down from the top. Open it back out and do the same on the other side.
22. Flip your bunny upside down. The fold you've just made should have formed a 'W' shape.
23. Make mountain folds along the 'W' shape.

24. The 'W' folds will collapse in as you press the bunny flat.
25. Lay the bunny flat with the ears facing you. You will be able to see 3 flaps at the back of your bunny.
26. Take the bottom flap and fold it in to meet the back of the middle flap.
27. Take the bottom layer and fold it in using the existing crease as a guide. This will form the top edge of one side of the basket.

28. As you do this you need to flatten out the inside of the ear to make a triangle.
29. Press the triangle flat.
30. Turn the bunny over and repeat on the other side.
31. Remember the fold we made along the head in step 20? We need to collapse it in to make another 'w'. It's marked with the bone folder above
32. You will see 3 creases on the head of your bunny. You need to make a small triangular fold between the 1st crease and halfway between the 2nd and 3rd.
33. Make a 2nd fold by folding the paper down again. Line up, the point of the triangle from the previous fold with the 1st crease on the head.
When making the 2nd fold only fold halfway. Then run your finger up the inside of the ear it create the ear shape. This part can be tricky. You may need to refer to the video found below for help.
34. Repeat on the other side to make the 2nd ear.
35. Round the shape of the head by making a small triangle fold on each side.
36. To finish your bunny pop the base and the head open by running your finger along the inside and pressing it flat.
Need more help? Keep scrolling for the video tutorial.
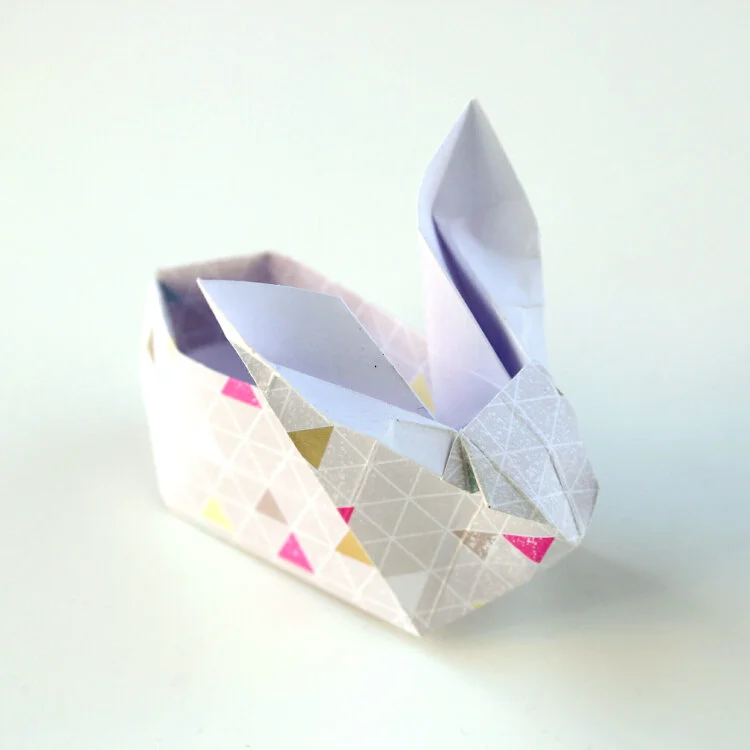
And that's it. Fold and fill with chocolate mini eggs or maybe a creme egg or two for an adorable Easter treat.
Of course, it doesn’t have to be used to hold eggs. Pop an LED battery powered tea light in and you’ve got a cute dining table decoration. Perfect for an evening meal on the Easter weekend.
Happy folding friends.


