DIY Air Dry Clay Marbled Bowls
/Transform plain air dry clay into stunning DIY Clay Marbled Bowls with this easy tutorial! Learn how to use nail polish and water marbling to create one-of-a-kind bowls finished with elegant gold rims. Perfect for jewellery dishes, handmade gifts, and modern home décor.

This page contains affiliate links. This means that if you make a purchase after clicking a link, I earn a small commission, but it doesn’t cost you a penny extra.
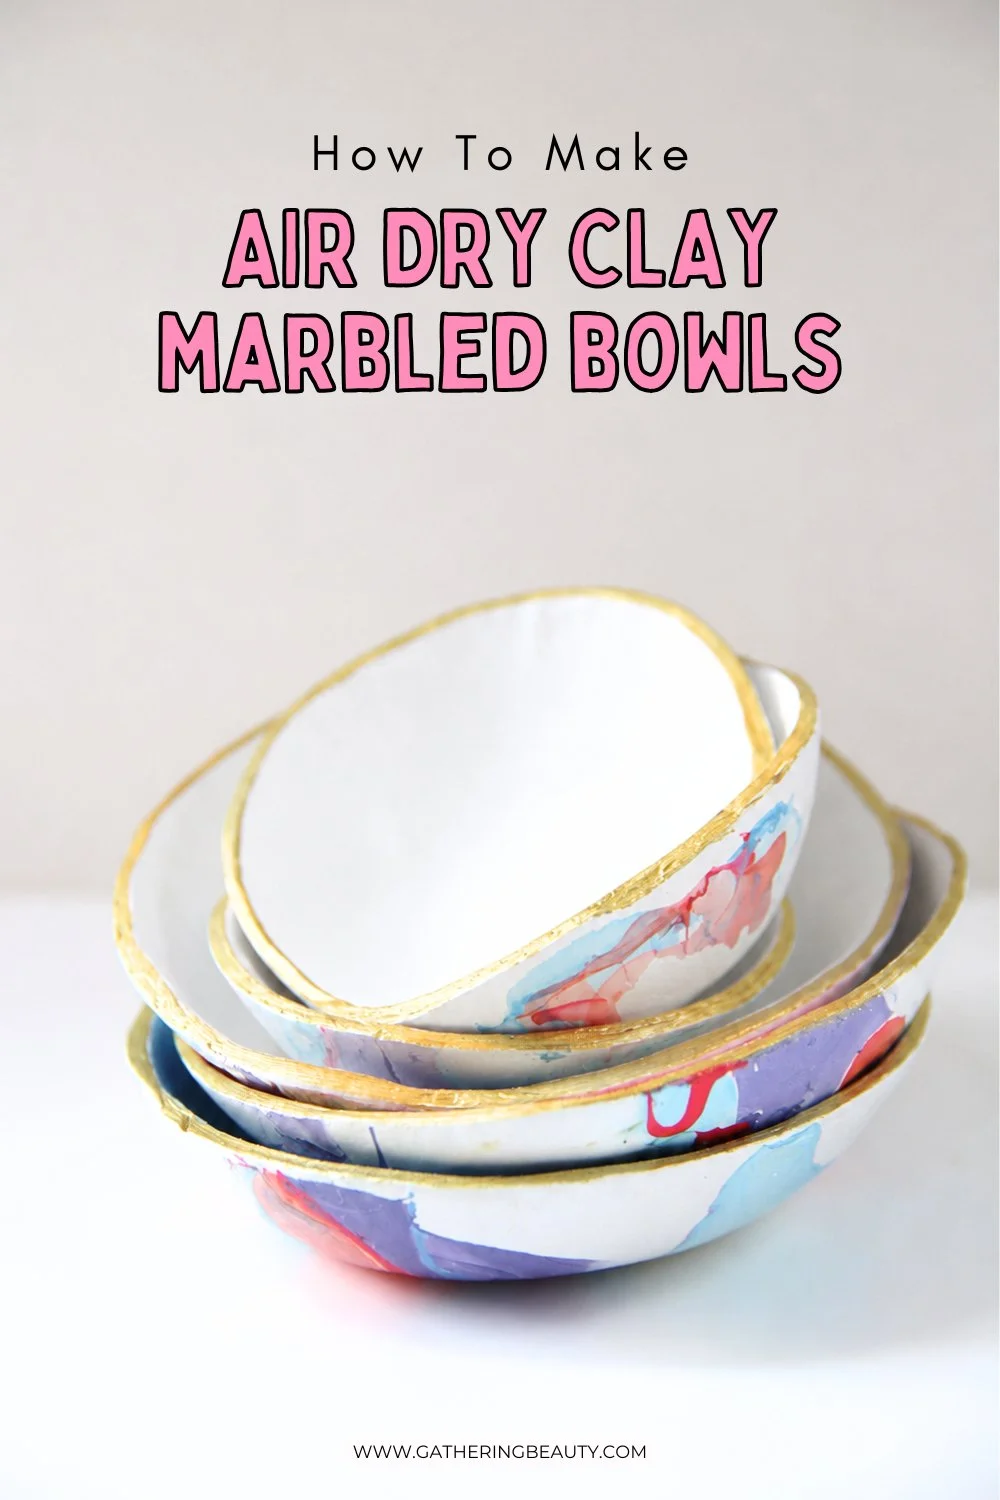
DIY Marbled Air Dry Clay Bowls.
If you're looking for a fun way to transform plain air-dry clay into something truly eye-catching, these DIY marbled clay bowls are just the project for you.
Using nothing more than air-dry clay and a few bottles of nail varnish, you can create beautiful swirled patterns that look completely unique every time.
Related: How To Use Air Dry Clay

I love working with air-dry clay because it's inexpensive, easy to find, and doesn't require any special equipment. Pair it with a simple nail polish marbling technique and you can create decorative bowls that are perfect for holding jewellery, keys, loose change, or other little treasures.
The best part? No two bowls will ever look exactly the same.

Supplies:
Glass Bowls
Knife
Sandpaper
Nail Varnish
Room temperature water in a disposable or old bowl,
Toothpicks or Skewers,
Nail Varnish Remover for when things get messy.
Gold Marker (optional)
Clear Sealer or Varnish (optional)
A few things to note before we start. Make sure you're in a well-ventilated room. The nail varnish fumes can get pretty strong, so an open window is a must.
Rubber gloves are also a good idea, as this can get quite messy. I would also recommend having some nail varnish remover nearby to clean up any spills and stained fingers.

How to make Simple Air-Dry Clay Bowls.
1. Roll out your air-dry clay to an even thickness of around 5mm.
2. Turn a glass bowl upside down and use it as a template to cut a circle from the clay.

3. Carefully lift the clay and drape it over the outside of the bowl.

4. Gently smooth the clay with your hands, allowing it to naturally form around the shape of the bowl.
Don't worry about making the edges perfectly even. Slightly irregular edges give these bowls plenty of handmade charm.

5. Leave the clay to dry for 24-72 hours.
Once the clay is firm enough to hold its shape but still slightly damp, gently lift it off the mould and allow it to finish drying on a flat surface.
As air-dry clay dries, it naturally shrinks slightly. If left on the mould for too long, the clay can tighten around the bowl, making it difficult to remove.
6. Use fine-grit sandpaper to smooth any rough spots around the edges and remove any imperfections.
This step makes a big difference to the finished look.

How To Create the Marbled Pattern.
1. Fill a shallow plastic container with room-temperature water.
2. Working quickly, drip small amounts of nail varnish onto the surface of the water. Alternate colours as you go, layering them on top of one another.

3. Use a wooden skewer to gently swirl the colours together.
Be careful not to overmix; you want beautiful flowing patterns rather than muddy colours.

4. Holding the bowl by the sides, carefully dip the outside surface through the marbled polish floating on the water.
5. Lift the bowl out slowly and allow any excess water to drip away.
The nail varnish will cling to the surface, creating gorgeous swirls of colour across the outside of the bowl.

6. Set the bowl upside down to dry.

7. For an extra-special finish, use a gold paint pen to trace around the rim of each bowl.
I left mine as they are, but you can seal the bowls with a clear varnish if desired. Make sure to check out my post all about how to seal air dry clay for more information.