
DIY Gold Air Cry Clay Stars
/Create gorgeous Gold Star Ornaments using air dry clay and gold leaf flakes! A fun holiday craft for adults and older kids that adds a touch of sparkle to your Christmas tree, garlands, and gift wrapping.

DIY Air Dry Clay Gold Stars.
Looking for a simple Christmas craft that looks far more expensive than it actually is? These DIY Air Dry Clay Gold Stars are one of my favourite holiday makes.
They're quick to create, require only a handful of supplies, and the finished ornaments have a beautiful textured metallic finish that catches the light perfectly.
Related: How To Use Air Dry Clay

I love working with air dry clay because it's affordable, easy to use, and doesn't require any special equipment.
Add a little gold leaf and some colourful wool for hanging, and you've got a set of handmade decorations that look lovely on a Christmas tree, tied onto gifts, or displayed in a festive garland.

Supplies:
Parchment/Greaseproof Paper
Straw
Fine Sandpaper
Acrylic Rolling Pin
Yarn or Ribbon to hang.

How To Make Gold Clay Stars.
1. Place your air dry clay on a sheet of baking paper and roll it out until it's approximately 5mm thick.
If you're worried about the clay sticking to your work surface, you can roll it out onto some parchment paper first. This makes it easier to lift your clay shapes away without stretching and distorting your stars.
2. Use a star-shaped cookie cutter to cut as many stars as you can from the clay.

3. Using a drinking straw or skewer, create a hole near the top of each star.
4. Make sure the hole is large enough for your wool or ribbon to pass through once the ornaments are dry.
5. Leave the stars to dry completely according to the instructions on your clay packaging.
Depending on the brand and thickness, this can take anywhere from 24 to 72 hours. Remember, the thicker the clay, the longer it will take to dry.
Top tip: Turn the stars over halfway through drying to help prevent curling and encourage even drying.
6. Once fully dry, lightly sand the edges and surfaces of the stars to smooth away any rough spots.
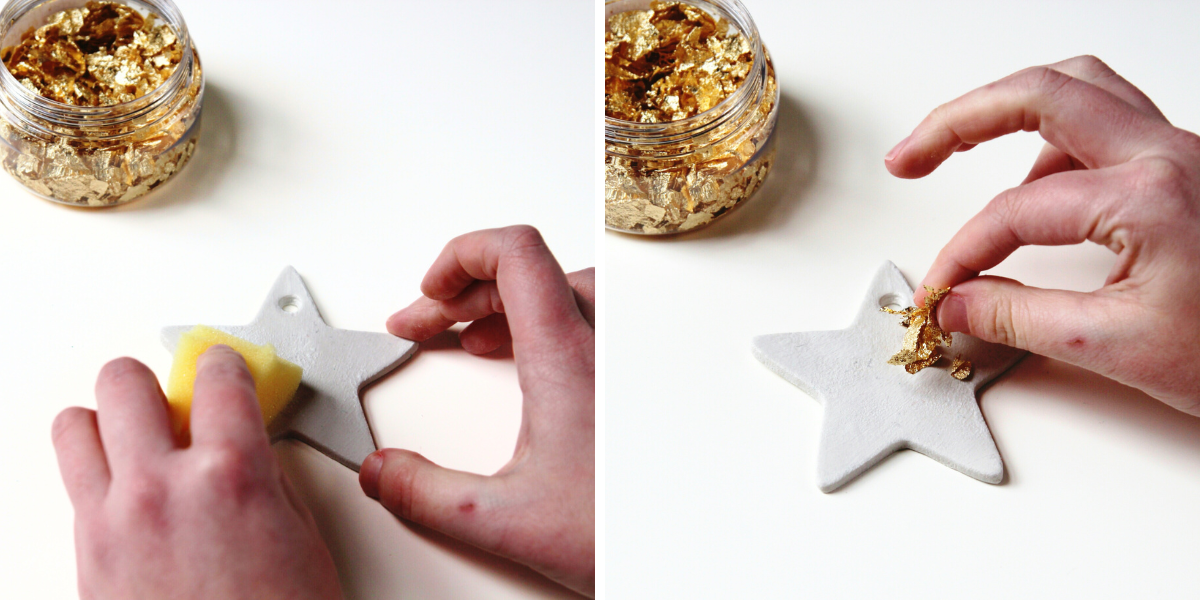
7. Sponge a thin layer of gilding adhesive onto the surface of each star and allow it to become tacky according to the manufacturer's instructions.
8. Carefully press gold leaf flakes onto the adhesive.

Don't worry about being too neat; the slightly uneven texture is what gives these ornaments their beautiful handmade appearance.

9. Once the adhesive has dried, use a soft brush or clean cloth to gently remove any loose gold leaf.
10. Gently buff the gold leaf until you’re left with a gorgeous metallic finish.

11. Thread colourful wool, yarn, ribbon, or twine through the holes and tie the ends together

Tips For Using Gilding Flakes.
The flakes are extremely light and get everywhere, so make sure you have any windows closed and air conditioning off.
Put some scrap paper under anything you're gilding; this way, you can catch any excess and use it again.
When applying the adhesive, try not to use too much; a thin layer is all you need.
If you apply too much or don't let it dry enough, you'll find that when it comes to burnishing (buffing away the excess flakes), all you'll do is clump the flakes and glue together and leave you with a patchy finish.


