How To Make Easy Origami Crowns
/Looking for a fun party craft? Learn how to fold an easy origami crown using just paper! Perfect for birthdays, photo booths, dress-up play and special occasions. Great beginner project with step-by-step instructions.

This page contains affiliate links. This means that if you make a purchase after clicking a link I earn a small commission but it doesn’t cost you a penny extra!
DIY Origami Crown.
If you're looking for a fun and oh-so-easy project to brighten up your day (or someone else's!), you have to try making a simple origami crown. These paper crowns are one of my all-time favourite origami projects.
They’re fun to fold, can be easily customised and perfect for birthday parties, photo booth props at showers and weddings! You only need a few pieces of paper, some simple fold and you’ll have a lovely origami crown that’ll make anyone feel like royalty.
Related: 20+ DIY Paper Crowns

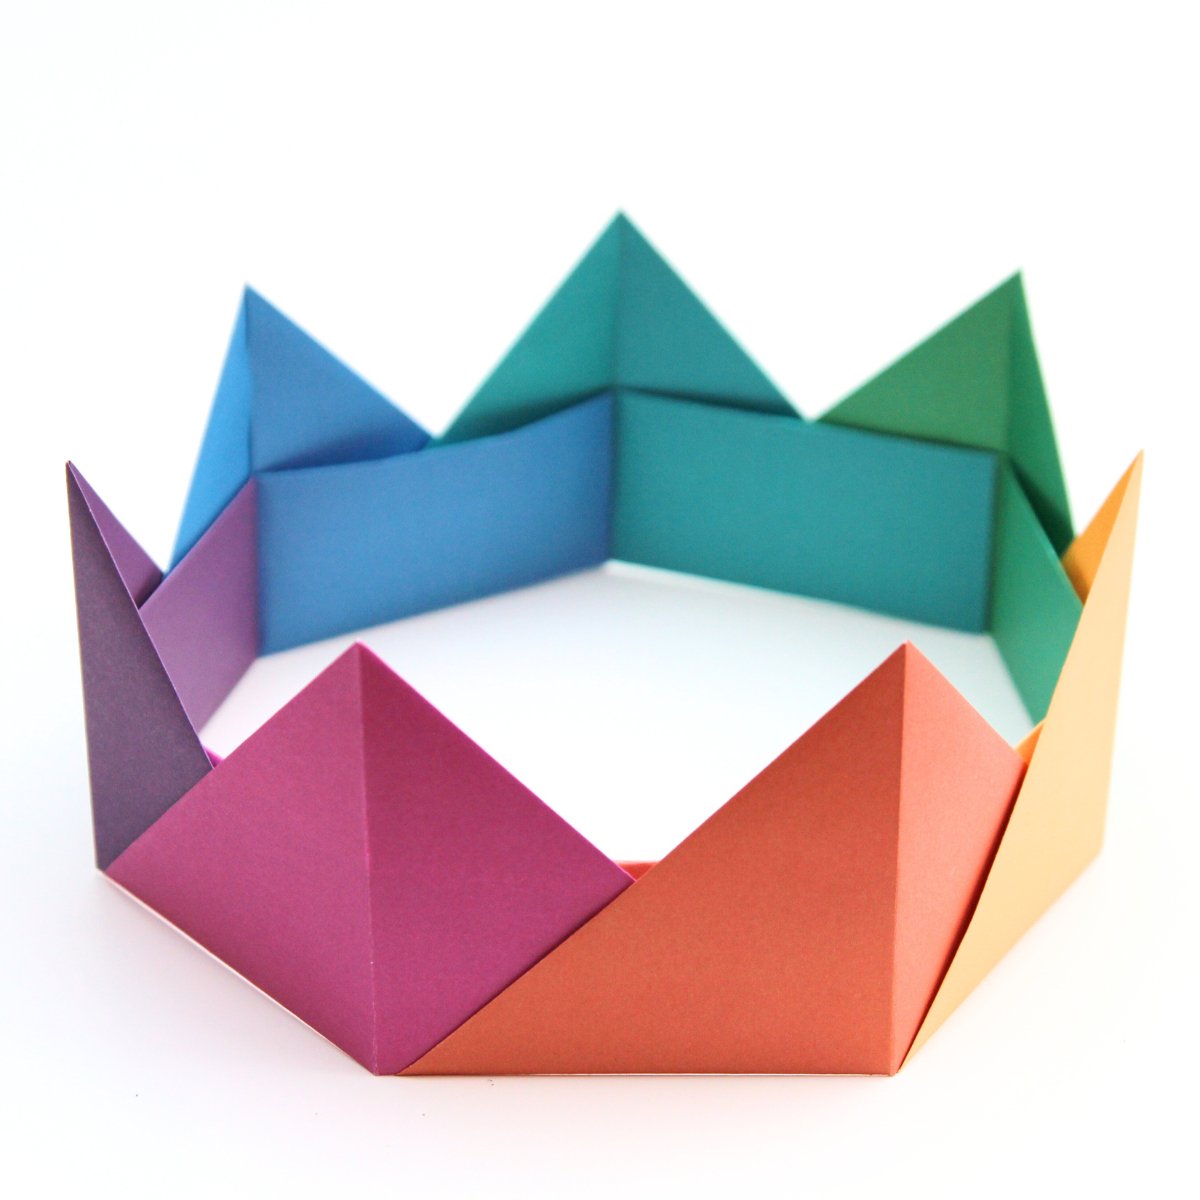
Origami Paper Crowns.
Not only are these crowns a great way to introduce beginners to origami but they’re also a budget-friendly and eco-conscious homemade party favour. You can make a whole stack of crowns using origami paper or even upcycle scrapbooking sheets or gift wrap.
These modular origami hats are made by connecting folded triangle pieces together. This means you can make them in any size depending on the size of the crown you want!
They are simple enough for kids to make but they may need a little help with putting the crown together at the end as the last couple of steps can be a bit tricky.

Supplies:
Square Origami Paper (or trim regular paper into squares)
A flat surface to fold on
Psst! I’ve linked my favourite bright origami paper packs here - affiliate link alert!

1. Take a square and fold it in half horizontally and vertically to find the centre of the paper and make your centre crease. Unfold.

2. Fold the top corners down to meet the centre crease, forming a triangle shape at the top.
3. Fold the bottom edge of the paper up to cover the base of the triangle.

4. Fold the bottom rectangle piece up again and crease.
This helps lock the triangle in place and forms the ‘band’ of your crown unit.
5. Fold in half with the right side over and on top of the left side. Crease along the centre fold line.

6. Open back out to make the first piece of your crown.
7. Repeat and make 6 more pieces.
You’ll need about 8–10 units depending on the size of the crown you want.

8. To assemble the crown you need to slide the bottom corner of one piece into the bottom edge pocket of the next.
To do this you need to unfold the bottom of the left piece twice (yellow above) and unfold the bottom of the right piece once (orange).
9. Slide the right piece (orange) over the left piece (yellow) until it meets the centre fold.
10. Fold the left (yellow) piece back up to cover the right (orange) piece.

11. Add the next piece by sliding the right side piece under the pocket on the left.

12. Carry on adding more pieces.

13. For this crown I used 7 pieces.

14. Fold the bottom edge back up to secure the pieces in place.

15. Now for the tricky part. Lift up the strip of origami pieces and make a circle with a gap in the middle.
16. To finish the crown we need to slide the first piece (yellow) into the last piece (green) to form a complete circle.

17. If you’re having trouble it can help to pull the first piece (yellow) back down as you slide the pieces together.
18. Remember to fold it back up as you finish assembling the crown.

Voilà - your cute origami crown is done!