6 DIY WALL ART PROJECTS.

6 Diy Wall Art Projects

Have you ever wanted to have a go at making your own wall art but didn't know where to start? These 6 diy wall art projects might be just the answer.

(clockwise from top)

1. Brighten up a dull wall with this graphic diy modern quilt art from A Beautiful Mess.

2. Poppytalk shows us how to make our own diy buffalo print.

3. Soft spot for metallics? Try this diy geometric wood art from clad and cloth.

4. Check out this simple yet effective fiber wall art by The Merry Thought. Clever, right?

5. Download these fantastic prints for free over on The Lovely Drawer and then hang them using customised trouser clamps.

6. Not sure what to do with all those instagram pictures? Why not have a go at this diy instagram wall calendar. How great would that look above a desk or on an office wall?

Comment

Emma

Hi, I'm Emma.

I'm a crafter, blogger and paper enthusiast living in the North West of England.

Gathering Beauty is the place where I share craft tutorials and diy inspiration. I started this blog back in 2013 as a way of sharing all the things I love and make. I share paper crafts, clay crafts, origami, printables and desktop wallpapers as well as the odd crochet and weaving project. I hope you find something here that inspires you.

SUGAR DIPPED FRENCH TOAST FINGERS.

Sugar Dipped French Toast Fingers

Today I wanted to share these amazing sugar dipped french toast fingers with you. I had them for lunch and let me tell you not only are they delicious and taste just like doughnuts, they're also really easy to make. All you need is stale bread or brioche in this case, eggs, milk and sugar and you're all set. A perfect decadent breakfast treat.

Ingredients for Sugar Dipped French Toast Doughnuts

Ingredients needed to make your own Sugar Dipped French Toast Fingers:

2 large eggs

60 ml semi-skimmed milk

Brioche buns

Caster sugar

25g butter

1 tbsp vegetable oil

1. Slice your brioche into 2 inch fingers.

2. In a bowl whisk together the eggs and milk.

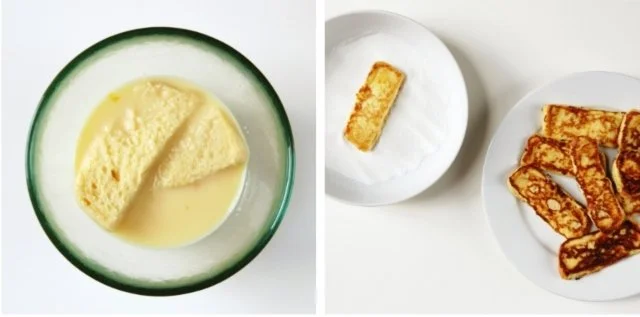
3. Soak your brioche fingers in the egg mixture.

4. Add the butter and oil to a frying pan and heat. Fry your egg soaked brioche fingers until they are golden brown on both sides.

5. Dip your fried french toast fingers into the caster sugar and coat evenly.

6. Serve while hot.

Recipe adapted from here.

Sugar Dipped French Toast Fingers

What do you think? If you wanted you could even try adding cinnamon to the sugar like I did with these pastry stars or maybe just drizzle them with some strawberry sauce, either way I'm sure they'd be delicious.

Don't forget to follow me over on pinterest for more sweet treat ideas.

Sugar Dipped French Toast Fingers
Comment

Emma

Hi, I'm Emma.

I'm a crafter, blogger and paper enthusiast living in the North West of England.

Gathering Beauty is the place where I share craft tutorials and diy inspiration. I started this blog back in 2013 as a way of sharing all the things I love and make. I share paper crafts, clay crafts, origami, printables and desktop wallpapers as well as the odd crochet and weaving project. I hope you find something here that inspires you.

A SUMMER BREAK IN CORNWALL.

Summer in Cornwall

I'm back from spending two lovely, sunny weeks in Cornwall visiting my friend and her family. I don't get to see her enough so two weeks was a treat.

I had the best intentions of blogging while I was down there but that didn't quite go to plan and I can't say I'm sorry. It was a much needed break to catch up, recharge and switch off from technology, although I probably didn't switch off as much as I could have (yes, pinterest, I'm talking about you).

We watched this show, ate the most amazing nachos here, cried with laughter at this and ate a lot of cake and I mean A LOT.

Here's a few photos from the last couple of weeks.

Exploring Cornwall
Just Breathe
Comment

Emma

Hi, I'm Emma.

I'm a crafter, blogger and paper enthusiast living in the North West of England.

Gathering Beauty is the place where I share craft tutorials and diy inspiration. I started this blog back in 2013 as a way of sharing all the things I love and make. I share paper crafts, clay crafts, origami, printables and desktop wallpapers as well as the odd crochet and weaving project. I hope you find something here that inspires you.

THINGS I'VE MADE FROM THINGS I'VE PINNED - WATERCOLOUR HAND DRAWN TYPOGRAPHY.

Watercolour Typography - Some Things Take Time

This week I've been having a go at watercolour hand drawn typography. I've always had a soft spot for all things type, in particular anything hand drawn (or maybe it's handpainted) using brushes and brushstrokes but I never quite knew where to start. I was scrolling through my things to make and do board looking for my next project to try when I came across this brilliant tutorial for watercolour lettering I'd pinned and forgotten all about. It seemed like a great place to start so I grabbed a paintbrush and paper and got to work.

Diy Watercolour Lettering

Full disclaimer, I should start by saying that what you see above was not my first attempt. I went through a whole stack of scrap paper before I felt confident enough to use the good stuff. I didn't want to waste all my good paper practicing.

Creating hand drawn watercolour lettering

I followed the advice in the tutorial and mapped out my design in pencil first. I mixed a dark inky blue acrylic paint and made sure my brush was loaded with paint then started painting over my lettering. To help get some variation in your lettering the tutorial recommends adding pressure on the downward strokes and pressing lighter on the upwards strokes. For some reason I did the opposite but think it turned out ok.

Practicing watercolour lettering

Has anyone else had a go at doing their own hand lettering? I've got this one taped above my desk. I'm not a hundred percent happy with it but I don't think it's a bad start.

Comment

Emma

Hi, I'm Emma.

I'm a crafter, blogger and paper enthusiast living in the North West of England.

Gathering Beauty is the place where I share craft tutorials and diy inspiration. I started this blog back in 2013 as a way of sharing all the things I love and make. I share paper crafts, clay crafts, origami, printables and desktop wallpapers as well as the odd crochet and weaving project. I hope you find something here that inspires you.

MADE BY YOU.

Diy Stamped Clay Bowls from Healthy Nibbles & Bits.

Happy Monday everyone. Today I wanted to share Lisa's fantastic blog Healthy Nibbles & Bitswith you. She made the gorgeous clay bowls in the photo above inspired by my own Stamped Clay Bowls. Aren't they great? I love the stamp she used and that she put her own spin on them with the fluted edges.

It's the best feeling to know that people are actually making the things I'm sharing on this blog. If you've been inspired to make something from the any of the tutorials so far and would like to see them featured here please get in touch. You can tag me on instagram @emliston or email me directly at gatheringbeautyblog{@}gmail.com. I'd love to see them.

If you want to see more of how Lisa made her own clay bowls you can go here and if you're looking for some healthy recipes here's a few from her blog that caught me eye, banana peanut butter pops, clever microwave lemon poppy seed cake and sweet and salty granola bars.

Thanks to Lisa for letting me use her photo and don't forget to check out her out on pinterest

and instagram.

Comment

Emma

Hi, I'm Emma.

I'm a crafter, blogger and paper enthusiast living in the North West of England.

Gathering Beauty is the place where I share craft tutorials and diy inspiration. I started this blog back in 2013 as a way of sharing all the things I love and make. I share paper crafts, clay crafts, origami, printables and desktop wallpapers as well as the odd crochet and weaving project. I hope you find something here that inspires you.