
How To Make A DIY Box Out Of 12x12 Cardstock
/Learn how to make an Easy DIY Paper Gift Box (complete with a lid!) out of 12x12 cardstock. Perfect for birthdays, holidays, or any other gift-giving occasion.

This post is originally from 2016 but has since been updated.
This page contains affiliate links. This means that if you make a purchase after clicking a link I earn a small commission but it doesn’t cost you a penny extra!
DIY Paper Box.
I'm super excited to share a new paper craft project with you today. We're going to make a fantastic box using just one sheet of 12x12 cardstock. Trust me, it's easier than you think!
I love working with paper because it’s so versatile and making boxes is one of my favourite things to do. They're perfect for storing small trinkets, giving gifts, or even as decorative pieces for your shelves.
And of course, they're totally customisable, so you can match them to any party theme that you want.

Rectangle One Sheet Gift Box.
This box is a bit bigger than the ones I've made in the past. You can find all my DIY Gift Boxes here. It measures 6 x 2½ x 3 inches and I think it'd be great for holding chocolates, small candles or even some posh biscuits.
I love creating these boxes for party favours. They're a hit every time, and guests love taking home something handmade.
Using scrapbook paper for these boxes adds a lovely touch with its bright colours and beautiful patterns. Plus, it's a great way to use up your scrapbook paper stash!
With a little practice, you should be able to make one of these in around 10 minutes. Perfect for those last-minute gift-giving emergencies.

SUPPLIES:
Scrapbook Paper - each box uses only a single sheet of 12 x 12 scrapbooking paper! How good is that?
Sadly the Market Street Paper Kit I used to make these boxes is no longer available but you can find more pretty papers here.

1. Using either a scoreboard and bone folder or an embossing tool and a ruler score lines at 3 inches and 9 inches.
2. Rotate your paper 90 degrees and score lines at 1 in, 3½ in, 6½ in and 9 inches.
3. With the 1-inch scoreline at the top cut along the 3½ in scoreline down to the 3rd scoreline (6½ in mark) and cut down the 9 in scoreline to the 3rd scoreline as well.
4. From the bottom cut along the 3 and 9 in mark this time only to the 1st scoreline.
5. Next cut off the 2 corner tabs. You can see the tabs you need to cut off in the photo in the top right corner.
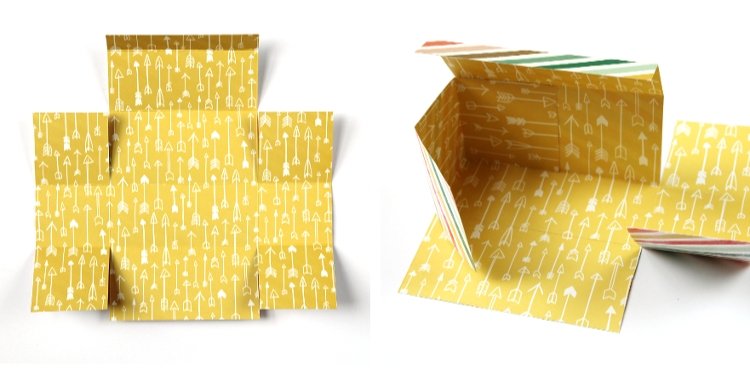
6. Fold along all the scorelines.
7. Stick the box together using some double-sided tape or paper glue making sure to fold the smaller side tabs on the inside.

8. To close your box you can either fold the lid inside or seal it on the outside with a sticker.
Optional extra: You can decorate by adding ribbons, tags, stickers, or even personalise it with the recipient's name.

Voila! You've just transformed a single piece of scrapbook paper into a cute paper box from scratch! It's perfect for small presents, party favours, or even as a storage solution for your trinkets.


