
DIY 3D ORIGAMI WALL ART.
/
It's been a quite few months since I last had a go at making something from something I've pinned. In fact it was way back in September when I made these mini notebooks from shipping tags. As soon as this Diy Origami Wall Display on Design Sponge I knew it was something I wanted to have a go at.
This wasn't a quick project. It ended up taking about 4 days from start to finish including drying time and a practice run using printer paper first. Each pyramid is made up of 3 interlocking origami pieces and I needed around 100 pieces to finish this. It felt a little tricky to begin with but once I'd made a few I was on a roll. This is a great project for when you're binge-watching tv (Sleepy Hollow anyone?) or listening to podcasts and in my opinion totally worth the time and effort.

Supplies:
Paper, I used the Kimono Gift Wrap Paper Book from Pepin.
I cut up my chosen sheets into 120 10 x 10cm squares
Scissors
PVA or Elmer's Glue
Paintbrush
Washi Tape
Mounting Board
The above links are affiliate links. This means that if you purchase through them I receive a small commission.

If you’re new to origami make sure to check out these 3 Basic Origami Folds For Beginners.
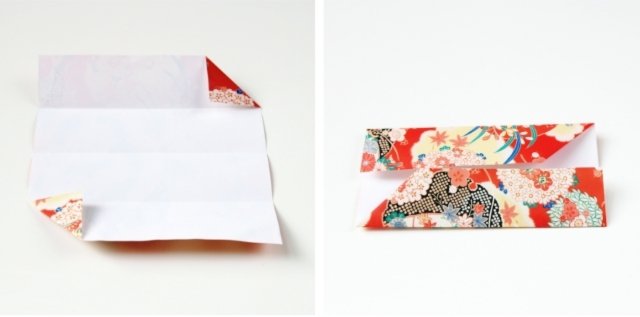
1. Take your square and fold it in half. Open it out and fold the bottom edge up to the middle fold you've just created. Turn your paper 180 degrees and do the same on the other side. Open out your paper. If should now be divided into four rectangles.

2. Take the top right corner and fold it in to meet the first crease. Turn 180 degrees and repeat. You should now have 2 triangles in opposite corners.
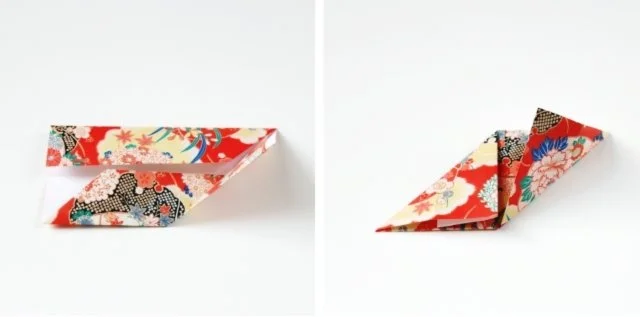
3. Fold in the bottom and top edges to meet in the middle.
4. Take the bottom right corner and fold it up to meet the top edge of your paper using the corners you've previously folded as a guide. Rotate and do the same on the other side.
5. Open out your paper. This time lift up the top flap and fold the bottom right corner back in. Rotate 180 degrees and do the same on the other side. The overlapping folds should make a cross in the middle of your folded paper. This is what makes the pockets you'll need later on when constructing your pyramids.
6. Rotate 90 degrees and fold in half. Your folded cross should be on the inside.
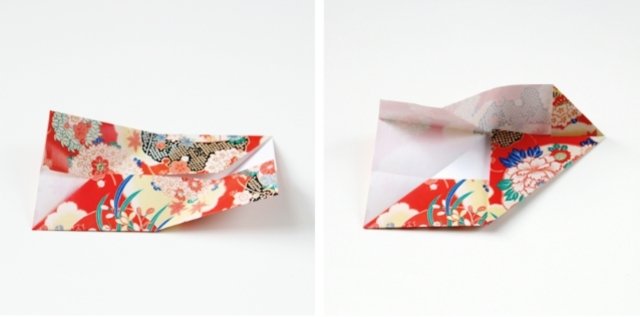
7. Fold the top right point down to meet the bottom left corner. Fold the top left point back to meet the back of the bottom right corner.

8. Open it out a little and stand it up. It should now look like the picture in the bottom right.

9. Repeat and make a whole lot more of them.

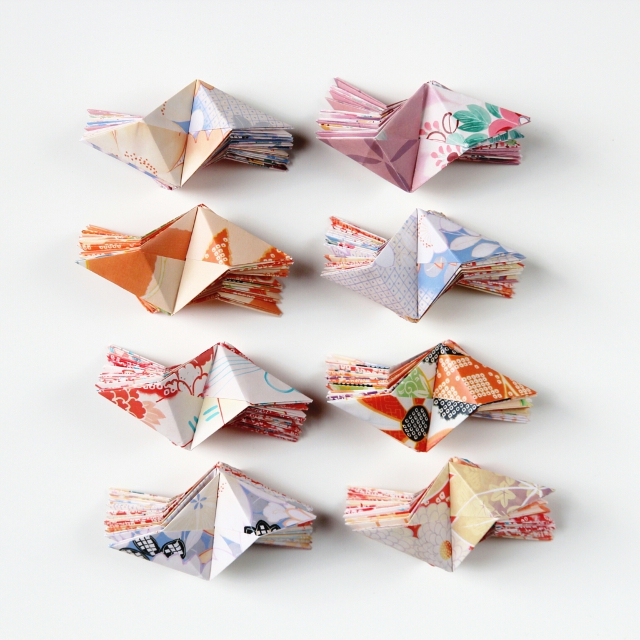
The original tutorial said to make about 100. I made a 120 over a couple nights. I wanted a few spare in case anything went wrong and I ended up using the spares to make a smaller version.
And in case you were wondering here's what a 120 of these look like.

To make each pyramid you need to interlock 3 pieces. Slide the corner of one piece into the middle pocket of another. Do the same with the third piece. In the bottom left square you can see there's one flap left. You need to slide this flap into the pocket on the third piece. This can be a little tricky and you might need to adjust each piece as you go.

Once you've made a few pyramids you can start locking them together to make your 3-D origami wall art. In the original tutorial I really liked the way they used different coloured paper to create theirs so I tried to group all the paler colours together at one end and the darker oranges and reds at the other.
I made the gif above using Giffysnap. It's made by the fantastic Dana of Wonder Forest. It's a really quick, easy and free way to make your own gifs. All you need to do is head on over to the site, add your photos, drag them into your chosen order, select the size and speed and hit create. You can download your gif or copy and paste some code so you can embed it on a blog.

Once you're happy with your piece you need to carefully turn it over. Adjust any pieces that have slipped out of place and secure any loose pieces on the edge with some tape.
Apply a thin layer of pva or Elmer's glue to the inside of each pyramid where the sides meet to hold it all in place. Try not to apply too much glue as it can pool and leak through the peak of each pyramid. Trust me you don't want to come back and find your origami stuck to the table.
Leave to dry for a couple of hours. I left mine overnight just to be sure.
Once dry mount or frame your 3-D origami wall art. I applied some more glue to the back of mine and stuck it to some mounting board before displaying it on the picture ledge above the sofa.

