
How To Make Air Dry Clay Pots
/Who says pottery is only for the pros? With air-dry clay, you can create beautiful pots right at home!
You can customise the size, shape, and design to match your home decor. Use them as mini plant pots or pencil pots. Plus, they make wonderful handmade gifts.
Add a splash of colour or keep it natural - it's all up to you!

This post is originally from 2015 but has since been updated.
This page contains affiliate links. This means that if you make a purchase after clicking a link I earn a small commission but it doesn’t cost you a penny extra!
DIY Clay Pots.
Today, I want to share with you one of my all-time favourite crafting materials: air-dry clay. Specifically, we'll be making DIY Clay Pots using air-dry clay.
Now, air-dry clay is a fantastic medium for crafting because, as the name suggests, it doesn't require any baking or firing in a kiln. It's super convenient and perfect for those of us who want to dive into pottery without investing in expensive equipment.
Another fantastic aspect of air-dry clay is its versatility. It's a forgiving medium that allows you to mould and shape your pots with ease.
Whether you want to create simple, minimalist designs or an intricate stamped pattern, air-dry clay gives you the freedom to let your imagination run wild.
Related: 25+ Air Dry Clay Pot Ideas
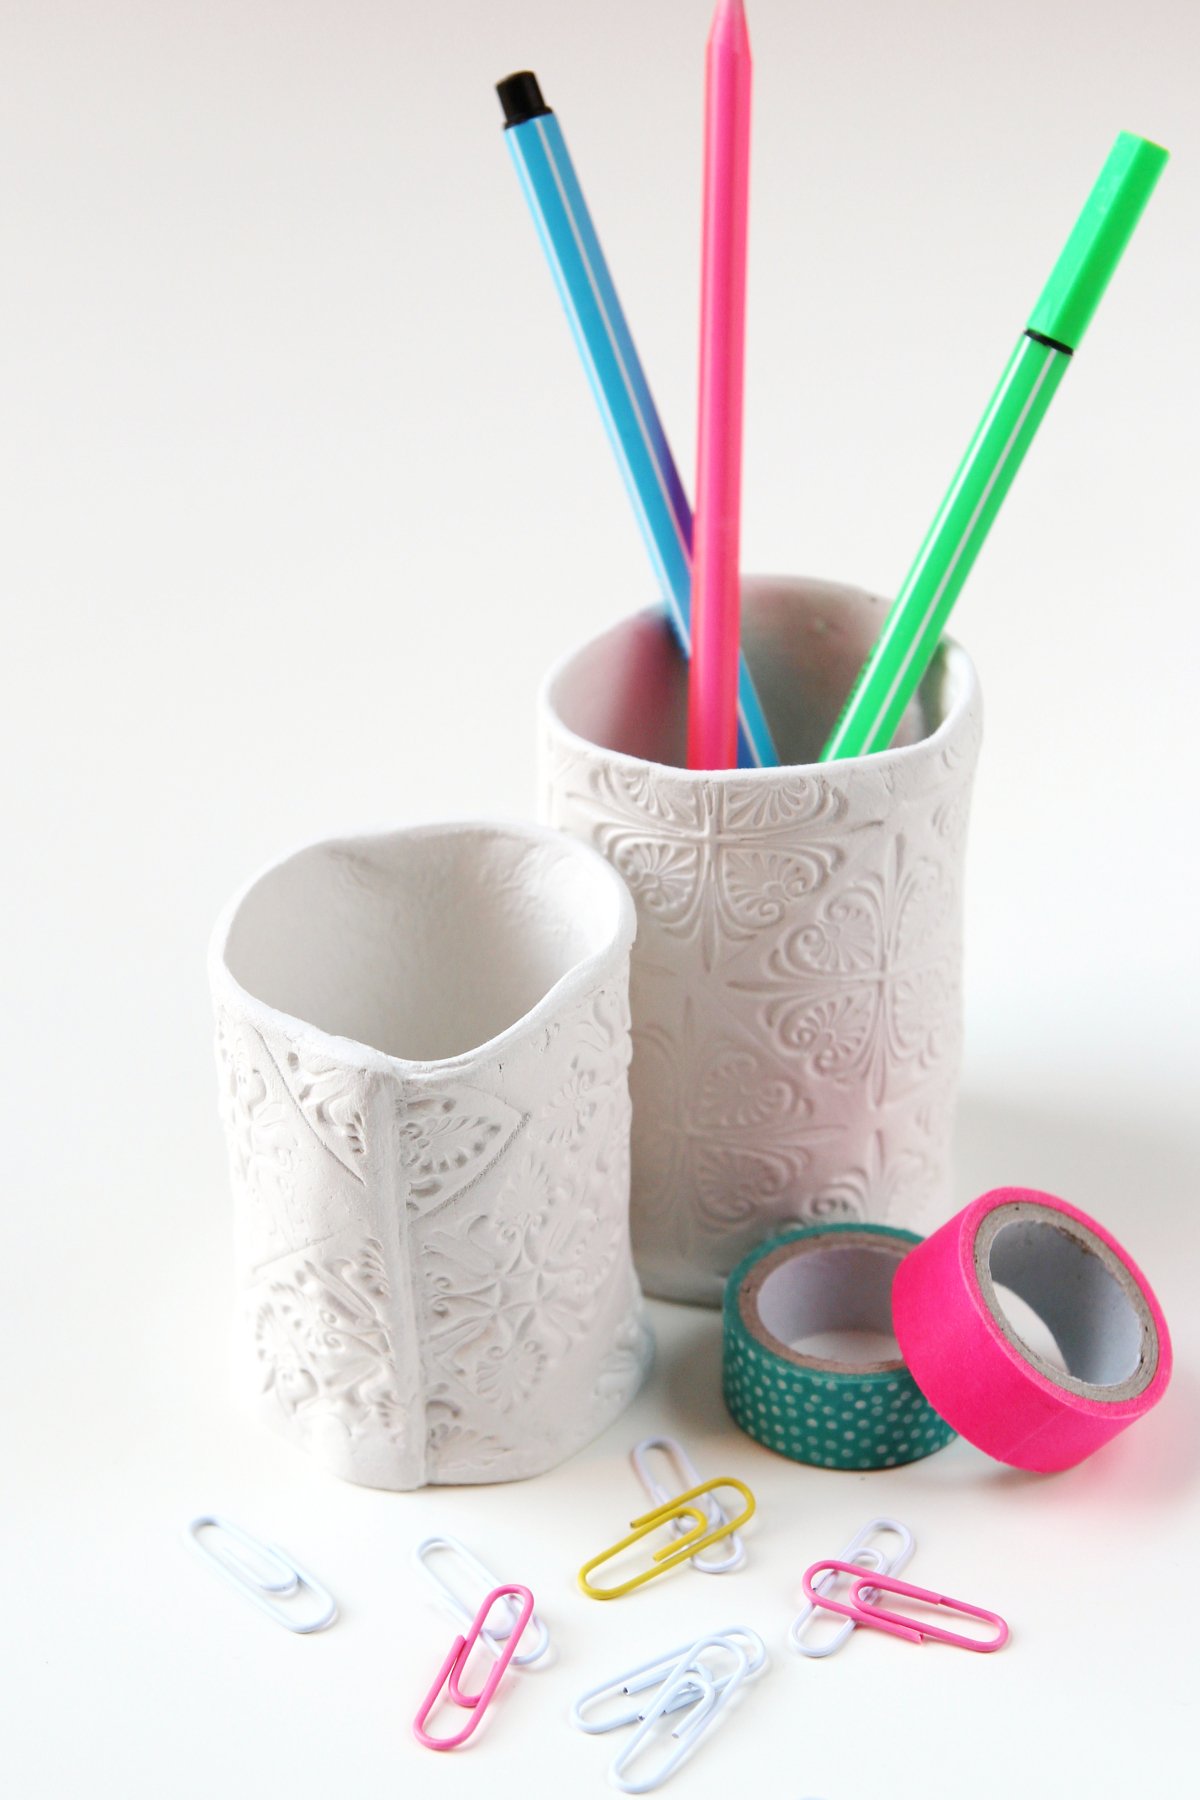
Air Dry Clay Pen Holders.
You can use your air-dry clay pots to hold small plants, flowers or pens. Of course, it doesn't have to be limited to pens alone. You can use it to hold paintbrushes, scissors, rulers, or any other stationery or tools you need to store.
I don't have much use for tiny plant pots. I only have two houseplants and they're both quite large but the one thing I can always use is more storage for my ever-growing stationery collection.
I decided to make these stamped clay pots and use them as pen holders. I used my favourite stamps and some leftover air dry clay I had from making these.

Supplies:
Air dry clay - You can find this at your local craft store or order it online. It comes in terracotta or white but I prefer the matte white finish.
A Small Glass Bowl
The above links are affiliate links. This means that if you purchase through them I receive a small commission.

How to make Air Dry Clay Pen Pots.
1. The first thing you need to do is make some clay slip.
Slip is watered-down clay you can use to glue your clay pieces together. Break off a few small pieces of clay into a bowl and cover it with water.
Leave for about 30 minutes to dissolve.
Remember, the smaller the pieces of clay the faster it will break down. You might need to give it a stir now and again.
2. Next, take some air-dry clay and knead it until it is soft and pliable.
3. Roll out the clay to about 3 mm thick. If you find the clay is sticking to your work surface try rolling it out on some greaseproof paper first.
4. Stamp your design onto the clay.

5. To make the sides of your pot use a knife to cut a rectangle out of the clay.
You can use a template if you want but I just cut mine free-hand as I don't mind the wobbly edges. For the base of the pot cut around a glass to make a circle.
As the air dry clay isn't food safe I used a disposable plastic knife or craft knife so I wasn't using anything that would later come into contact with food.

6. To help the clay stick together you need to score the edges first. This gives the clay something to grip on.
Flip your clay rectangle over so the stamped side is on the table and score a cross-hatch pattern about 1 cm in on any edges where the clay will touch.
In this case, I scored along the bottom edge and the right-hand side.

7. Apply a layer of slip to the parts you've just scored to help glue your pieces together.
8. Now comes the tricky part. You need to wrap your clay around the circle base and overlap the sides.
Make sure the part you've scored is on the outside and the unscored clay is on the inside.
The taller you make your pot the more trouble you can have with this part. My pots were around 8 cm tall and I did have a bit of a problem with them bending and buckling.
If you want to make your pots to be taller you may need to experiment with thicker clay.

9. Carefully turn your pot upside down and blend the edges of the clay sides and base together. You can use some more slip or water to help.
10. Leave to dry. Air-dry clay can take 24-72 hours to dry depending on the humidity and the thickness of the clay.
You can get more information here in my How Long Does Air Dry Clay Take To Dry? post.
Remember if you've used slip or water on the base of your pot you may need to leave it upside down, to begin with.
You don't want the clay drying and glueing itself to your table. I've done this before and trust me it wasn't fun to remove.

11. To finish sand away any rough edges.
I really like the matte white finish you get with this clay so I decided to leave mine as they were but you could paint them or varnish them any way you like.
If you want to protect your pots and give them a shiny finish, apply a coat or two of varnish once the paint is dry. This will also help make them more water-resistant.
For more tips and tricks on varnishing air dry clay read this post How To Glaze Air Dry Clay.


