THINGS I'VE MADE FROM THINGS I'VE PINNED: DIY WOVEN WALL HANGING.

THINGS I'VE MADE FROM THINGS I'VE PINNED: DIY WOVEN WALL HANGING.

Welcome to the second installment of Things I've Made From Things I've Pinned. This week I've been having a go at weaving. It seems like an understatement to say that woven wall hangings have been everywhere recently. My pinterest feed has been flooded with them. I've seen some amazing examples but it wasn't until I saw this tutorial from Honestly WTF pop up on Craftgawker that I finally decided to try making one myself.

Read More

DIY CIRCULAR WOVEN COASTERS.

Diy Circular Woven Coasters

I've been bitten by the weaving bug. Again. Last Summer I made a couple of weavings one of which I shared here on the blog. I loved making the smaller weavings. It was such a fun project but somewhere along the way I stopped making them and I forgot how much I loved it.

The other week I decided to make a mini weaving using a clipboard as loom and I fell in love with weaving all over again. I saw this brilliant tutorial over on Flax and Twine for a woven circular rug made using a hula hoop and this one over on A Beautiful Mess and knew that's what I wanted to make for my next weaving project. The only problem was I wasn't sure I had the patience for making a weaving that large. I decided to have a go at making a much smaller version using the leftover wool and trim from my last weaving project and so these DIY circular woven coasters were born.

Here's how I made them.

Supplies:

The above links are affiliate links. This means that if you purchase through them I receive a small commission.

1. To make the template you to cut out 2 circles, one in cardboard and one in paper circle. I used a dinner plate and traced around that.

2. You need to divide your paper up into 32 sections. I've seen similar tutorials using a protractor and a ruler but I found it easier to fold a piece of paper and use that as template instead.

Fold your paper circle in half and half again to divide it into 4. Fold it half again to make 8 sections. Open it out and fold the 2 edges in to meet the middle crease, it should now be divided into 16 sections. Open it out again and fold the bottom section in half to meet the first crease from the bottom. Open it out and fold the bottom edge up to meet the 3rd crease from the bottom. Rotate 180 degrees and repeat on the other side. Your paper should now be divided into 32 equal sections.

3. Take your folded paper circle and tape it to your card circle. Cut along each crease about 1/2 inch down. Remove your paper and you should be left with a card circle that has 32 slits cut around it. These slits are what's going to keep your wool in place.

4. To start with you need to hold or tape the loose end of your wool to the back of your circle. Push it through one of the slits and wrap it around to the front. Push it through the opposite slit, around the back and back to the front. These are going to be your warp theads. Every time you pull the wool through to the front move 1 slit to the left and 1 slit to the right as you pull it through to the back.

Keep going until you fill the whole circle. Flip your circle over. You'll have 2 loose threads on the back. You can either tape them down or tie them in a bow like I did.

4. To start off your weaving you need to cut some yarn and thread it onto a tapestry needle. Tuck the loose end of your wool under your warp threads, I left mine a couple of inches long.

5. Weave the needle over 2 threads and under the 2 threads, over and under until you reach the point where you started.

When you reach the starting point the next row you weave needs to be the opposite. You want to go under instead of over. To do this go over 4 threads instead of 2 (see the bottom right square above) before carrying on weaving over and under every 2. Each time you reach the starting point you need to either go under or over 4 threads before beginning the next row.

6. Pull your thread to tighten it but try not to tighten it too much. If you pull your wool too tight you'll warp the finished coaster (see photo after these steps for what not to do) and it won't lie flat.

7. Carry on weaving until you're happy with the result. You can see better in the 2nd photo down on the left what it looks like when you weave over 4 threads to begin the next row. Each time you finish a row pull your wool or yarn tight.

8. When you reach the end of your current colour you need to leave around a 4 inch tail at the end. Tuck this tail under the warp threads like you did at the beginning. You'll be dealing with all the loose threads at the end.

9. When you've woven a couple of inches out from the centre you can start weaving over and under every warp thread instead of every 2. This means when you begin a new row you need to weave over or under 2 threads instead of 4. This is the time when you can add any trims or thicker yarn.

10. Carry on weaving and adding more colours.

11. When it comes to adding the mini pom pom trim make sure to use a mug as a guide. It's no good adding the trim only to find out later you haven't left enough space for a mug.

12. When you're happy with your circular weaving turn it over and cut 2 threads at a time and knot them together.

Keep going until you have knotted all the warp threads in pairs.

13. Flip your coaster over and thread the knotted loose ends onto a tapestry needle. Thread the loose yarn under at least 4 stitches on the back of your weaving. Trim away any excess. Do the same for any loose yarn where you changed colour or trim.

And you're finished. Yey! Well done. You can flip your woven coaster back over and use.

Not what to do: circular weaving coaster mistake

A couple of pointers (so you don't make the same mistakes I did).

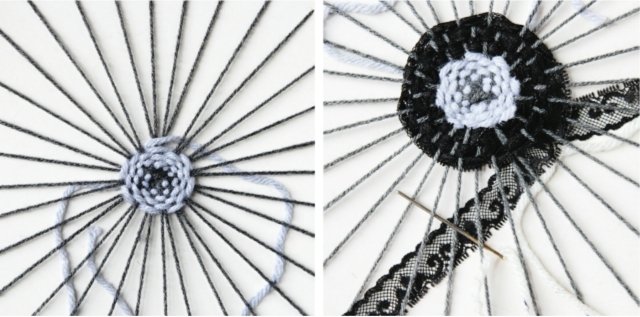
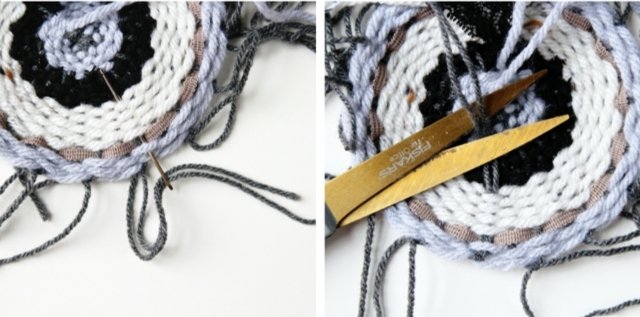
To begin with I found circular weaving a bit tricky. As you can see from my first attempt above I struggled to find the correct tension as I tightened my yarn. I didn't realise anything had even gone wrong until I started cutting and tying the warp threads together and my weaving began to curl. The best way I've seen it described is to pull your yarn until it fits snugly rather than tight, try to resist pulling it as hard as you can.

If you find you've made a mistake it's really easy, although a bit frustrating to fix. I kept forgetting to go over or under an extra warp thread ever time I reached the starting point. If you do this all you need to do go back and reverse your steps. I think the thing I love most about weaving is how easy it is to go back and fix any mistakes or problems.

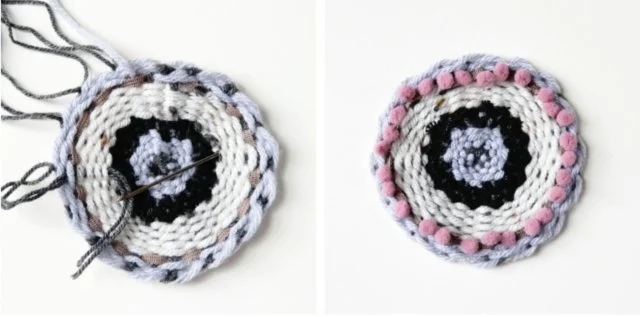
The first coaster and the mistake above each took a couple hours to finish. Once I'd had a little practice I was able to complete a coaster in under an hour.

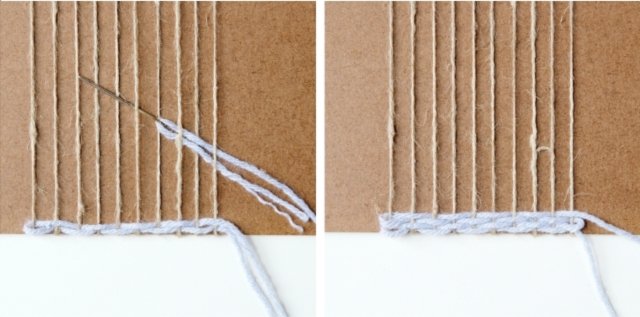
As you get to the end of your cardboard circle it can get harder and harder to weave. I found it was easier to make sure I had plenty of room left between the edge of my weaving and the cardboard rather than weave close to the edge. I used a dinner plate to make my template as this seemed to leave a good amount of space at the edges. This is something to bear in mind depending on the size of weaving you want to make. If you wanted to make a circular weaving as a placemat or rug you would need a much larger size template.

How to make woven coasters using a cardboard circle loom
Comment

Emma

Hi, I'm Emma.

I'm a crafter, blogger and paper enthusiast living in the North West of England.

Gathering Beauty is the place where I share craft tutorials and diy inspiration. I started this blog back in 2013 as a way of sharing all the things I love and make. I share paper crafts, clay crafts, origami, printables and desktop wallpapers as well as the odd crochet and weaving project. I hope you find something here that inspires you.

DIY CLIPBOARD LOOM MINI WEAVING.

Make this Diy Mini Weaving using a clipboard as a loom

I stumbled across this pin last week, a mini weaving made using a clipboard as a loom. It's a photo from Rachel Denbow's Instagram account. If you've ever googled how to weave I'm sure you've come across one of her amazing weaving tutorials for A Beautiful Mess. Each one is fantastic and well worth checking out.

I scoured Rachel's blog but couldn't find anything showing how she did it. I did however find a tutorial Rachel wrote on A Beautiful Mess showing you how to make a woven necklace using a piece of cardboard as a loom. Even though it's not exactly the same, a shed rod isn't used to help separate the warp threads, the principles are the same and I was able to combine the two to come up with my own clipboard loom.

I've covered the basics below but if you want to see anything in more detail like how I made the tassels you can read my original Diy Woven Wall Hanging post where I used a stripped art canvas frame as a loom.

Materials needed to make a Diy Mini Weaving

Supplies: 

The above links are affiliate links. This means that if you purchase through them I receive a small commission.

1. First we are going to make the warp. To do this wrap your twine around your clipboard. You want 10 rows on the front of your clipboard. Tie the 2 loose ends in a diagonal knot at the back of your clipboard.

To make your mini weaving wider all you need to do is add more rows but remember to add them in an even number so you can tie them off in pairs at the end. I'd also recommend using a twine or string that doesn't have any stretch to create your warp so your weaving will hold it's shape when it's removed from the clipboard.

2. To start the basic weave thread your chosen wool onto a tapestry needle and thread it under the 1st warp thread and over the 2nd, under the 3rd, over the 4th etc until you get to the end. Make sure not to pull your wool all the way through. You want to leave a tail of about 4 inches at the end. Don't worry about any loose ends at the moment as we'll be tidying them up later.

To stop your weaving getting tighter and tighter and ending up in an hourglass shape you can do something called the slanting technique. When you get to the end of a row pull the wool through on a slanted angle, use a fork to push down the wool at either end to make a hill and then push the hill down flat in the middle. Try not to pull the wool too tight. You can read more about it here.

3. Keep going with your basic weave until you're happy with it. I did 4 rows.

4. Keep weaving in different materials and textures until you reach the top of the clipboard. Make sure to leave tails at the beginning and end of each row.

I did a row of 5 tassels. You can see how I made them in more detail over on my Diy Woven Wall Hanging post. I doubled up the dark grey wool and did another 4 rows of basic weave. Next I added some pom pom trim and black lace ribbon. The mini pom poms can be a bit tricky, you may need to help them through as you weave. I did a couple of rows of the soumak stitch. You wrap the wool behind and around each warp thread instead of over or under. You can find a great tutorial for the soumak stitch over on A Beautiful Mess, scroll down to step 28. I carried on weaving in different textures and materials until I reached the top of the clipboard.

5. When you're happy with your weaving turn it over and cut through the warp threads about halfway up with a pair of scissors.

6. To secure your weaving and tidy up the loose ends tie each pair together in a double knot. Thread the ends onto a tapestry needle and pull them up through some of the stitches on the back. Trim away any excess. Tidy up all the loose tails at the end of the rows in the same way.

7. To attach your weaving to the dowel stitch through the top and tie the end tail to the dowel. Keep stitching and looping the wool over the dowel until you reach the end. Tie another double knot at the end to secure.

8. Tie some more wool or string to each side of the dowel and hang.

Make this Diy Mini Weaving using a clipboard as a loom

I've already made another two weavings using my clipboard loom. This weaving thing can get addictive. Next on my list, circular weaving. I love this diy woven hula hoop rug from Flax and Twine. So pretty.

Like this? You might like to check out my Diy Circular Woven Coasters.

Diy Circular Woven Coasters
Comment

Emma

Hi, I'm Emma.

I'm a crafter, blogger and paper enthusiast living in the North West of England.

Gathering Beauty is the place where I share craft tutorials and diy inspiration. I started this blog back in 2013 as a way of sharing all the things I love and make. I share paper crafts, clay crafts, origami, printables and desktop wallpapers as well as the odd crochet and weaving project. I hope you find something here that inspires you.