DIY MARBLED CLAY BOWLS.
/
Marbling with nail varnish is another one of those diy crazes that's been all over the internet lately and I've been itching to have a go at it. After seeing this video for marbling keys over on youtube and these amazing marbled pots and bowls over on Elise's blog I decided to make nail varnish marbling my next project. I whipped up another batch of my stamped clay bowls, this time without the stamping and got to work.
Things you'll need to make your own Nail Varnish Marbled Clay Bowls:
Bowls or pots to marble,
Nail varnish,
Room temperature water in a disposable or old bowl,
Toothpicks or skewers,
Thick quality paper to practice with,
And nail varnish remover for when things get messy.
A few things to note before we start. Make sure you're in a well ventilated room. The nail varnish fumes can get pretty strong so an open window is a must. Rubber gloves are also a good idea as this can get quite messy. I would also recommend having some nail varnish remover nearby to clean up any spills and stained fingers.
1. I started by I making bunch of mini bowls using air dry clay, eight to be precise. I wanted to make sure I had enough to practice and make mistakes on in case anything went wrong. If you want to make your own like I did you can see how by clicking over onto my stamped clay bowls tutorial.

2. To begin marbling fill a bowl with room temperature water. I've read a few different tutorials that said to use warm or even cold water otherwise the nail varnish dries too quickly. I found room temperature worked best but you may need to experiment.
3. Unscrew all the lids of your nail varnishes. Once you start you need to move quickly so you don't want to be messing around unscrewing each bottle as you go.

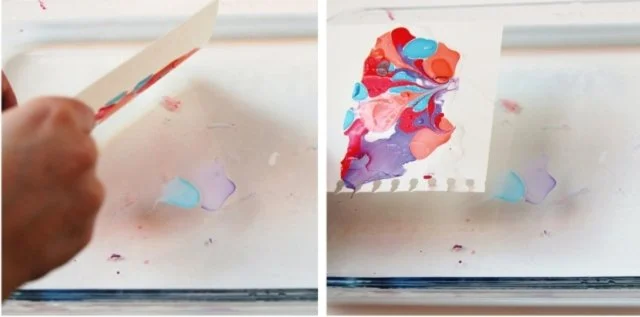
4. Hold your nail varnish close to the water. The higher the drop the more likely it is to sink straight to the bottom instead of floating on the surface. Drop/pour your nail varnish in colour by colour. Drag a toothpick through the nail varnish to create your pattern.

5. I found it's a good idea to practice first with some paper, this way you can see what colours combinations and patterns you like. Gently drop your paper onto the surface of the water and lift away. The nail varnish should now be stuck to your paper. Set the paper aside to dry.

Make sure to keep your practice pieces. You can cut these up later and use them as gift tags or as patterned paper backgrounds in cardmaking or scrapbooking.
6. Run your toothpick through the water to pick up any left over nail varnish. Your water is now ready to use again.
7. Repeat the steps above. When you're happy with the pattern dip your bowls carefully in the water. If you've made your own bowls using air dry clay make sure you don't leave them in the water for too long. The air dry clay is made using paper and will absorb any water. Treat it like you would normal paper and you should be fine.

8. Set your bowls aside and leave to dry. I lost 2 bowls to trial and error but ended up with 6 bowls I really loved.


9. To decorate the inside of the bowls I painted on 2 layers of nail varnish and used a gold gel pen to trim the edges. Once dry it created a shiny enamel finish to the inside of the bowls. If you don't want to use more of your nail varnish in this way you could also use any acrylic or craft paint. I only used cheap nail varnish (£1 each) for this project so I didn't mind using them up painting the inside as well.


The great thing about marbling is that every bowl is different. I think like all the things I make and share on here, this project being no different, the best advice I can give you is be patient, take your time and practice, practice, practice. Give it go and let me know how you get on.

You can find more crafts using air dry clay here.