MAKE FROEBEL (AKA GERMAN OR NORDIC) PAPER STARS DECORATIONS THIS CHRISTMAS - VIDEO TUTORIAL.

MAKE FROEBEL (AKA GERMAN OR NORDIC) PAPER STARS DECORATIONS THIS CHRISTMAS - VIDEO TUTORIAL.

Learn how to make these Froebel paper stars to hang on your Christmas tree this holiday season. A classic Danish Christmas decoration made of paper. These pretty 3D stars can be used to make garlands, hung from branches or windows or tied to a gift bag for the perfect festive finishing touch.

Read More

MAKE YOUR OWN DIY 3D ORIGAMI HEART WALL HANGING FOR VALENTINES DAY.

It’s February and you know what that means, right? Valentine’s day is nearly here and it’s time to start filling your house with cute heart themed decorations and crafts. Make your own 3D origami heart wall hanging with this video tutorial and fill your house with love.

MAKE YOUR OWN DIY 3D ORIGAMI HEART WALL HANGING FOR VALENTINES DAY #diy #crafts #valentines #valentinescrafts #valentinesday #valentinesdaycrafts #heart #origami #heart #origamiheart #wallhanging #gatheringbeauty

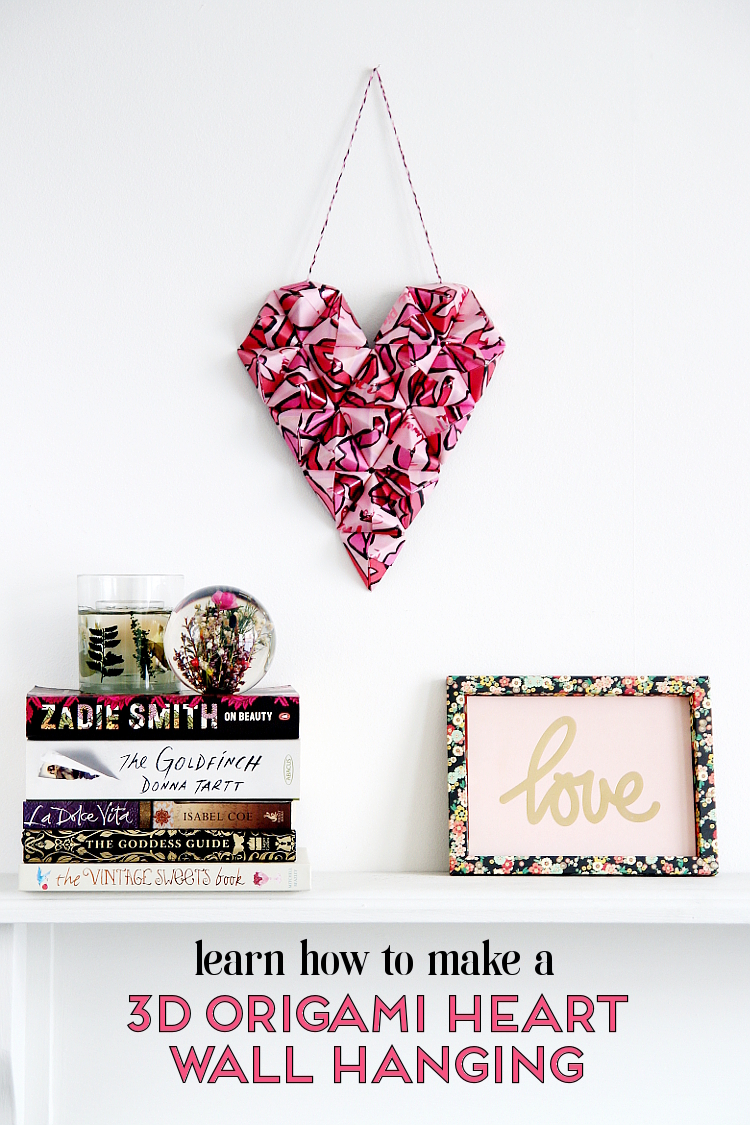
Even though I do love a good heart shaped craft I don't normally do a lot of decorating for Valentine's Day. Luckily a few hearts (or one big origami heart) here and there is all it takes to add a splash of colour and a little love to a room. This year the other half suggested making a heart shaped version of this 3D origami wall art and I thought sure, why not. Of course, it turned out to be a fantastic idea and I loved it so much I immediately took it apart so I could make it all over again and show you how to make one too ;)

SUPPLIES: Origami paper or gift wrap, a pair of scissors or a paper trimmerpva glue, a paintbrush and some string or yarn to hang.

I used a couple of sheets of pink and red lip covered gift wrap from Paperchase and the rest of the supplies I already had on hand so this was a really cheap project. In fact, I bought the gift wrap in the January sales so it only cost 25p a sheet. If you haven't got any origami paper gift wrap makes a good alternative.

This post contains affiliate links. This means that if you purchase through them I receive a small commission.

If you’re new to origami make sure to check out these 3 Basic Origami Folds For Beginners.

finished-3d-origami-heart-750.jpg

Each pyramid is made up of 3 origami pieces slotted together. You can use the above photo as a guide to put your 3D heart together. You'll need to make at least 22 individual pieces. I find some pieces fit together better than others so it's a good idea to make a few spare ones as well.

When you're finished putting your heart together you need to secure all the loose side pieces with some washi tape. Use a paintbrush to apply some pva to the inside of each of the pyramids and leave to dry. Try not to apply too much glue as it can pool and leak through the top of each pyramid and trust me, you don't want to come back and find your origami heart stuck to the table. Once dry thread some string through the top of your heart and hang.

You can watch the full tutorial below.

MAKE YOUR OWN DIY 3D ORIGAMI HEART WALL HANGING FOR VALENTINES DAY #diy #crafts #valentines #valentinescrafts #valentinesday #valentinesdaycrafts #heart #origami #heart #origamiheart #wallhanging #gatheringbeauty

Make sure to check out my other valentines crafts and recipes for more love-filled diys.

Love it? Pin the image below and save it for later?

MAKE YOUR OWN DIY 3D ORIGAMI HEART WALL HANGING FOR VALENTINES DAY #diy #crafts #valentines #valentinescrafts #valentinesday #valentinesdaycrafts #heart #origami #heart #origamiheart #wallhanging #gatheringbeauty
Comment

Emma

Hi, I'm Emma.

I'm a crafter, blogger and paper enthusiast living in the North West of England.

Gathering Beauty is the place where I share craft tutorials and diy inspiration. I started this blog back in 2013 as a way of sharing all the things I love and make. I share paper crafts, clay crafts, origami, printables and desktop wallpapers as well as the odd crochet and weaving project. I hope you find something here that inspires you.

DIY ORIGAMI DIAMOND DECORATIONS.

DIY ORIGAMI DIAMOND DECORATIONS

I first stumbled across these origami diamond decorations on How About Orange around 3 years ago and instantly fell in love with them. I've been noticing more and more origami ornaments popping up in the shops so I thought it was about time I go back and try making my own. I love how they've turned out. They're surprisingly sturdy and would look fantastic hanging on a Christmas tree.

Depending on the paper you choose you could hang these decorations all year round. I made mine using the last of pages from this sticker book which is now sadly out of stock. I bought a couple as gifts for people and wish I'd bought a couple more to keep for myself. The paper is far too pretty not to want to use it in every single future paper project, don't you think?

And make sure to check out the rest of my Christmas Origami projects.

1. Start with your paper facing pattern side up.

2. Fold in half along both diagonals.

3. Flip the paper over and fold in half along the horizontal and vertical lines.

4. Pinch together at the center and collapse down to make a triangle.

5. Make sure the open end is at the top and fold both sides in to meet at the center. Flip it over and repeat on the other side to make a diamond shape.

6. Cut away the small triangles at the top.

7. Make sure the open end is now at the bottom. Fold out one of the sides and open it out. Flatten it out towards the opposite side. It should now outwards instead of inwards. Repeat on the remaining 3 sides to make concertina.

8. Fold the bottom corners in to meet at the center.

9. Open the corners back out.

8. Open the paper back out and fold all the corners in and under.

9. Repeat steps 1-8 to make the 2nd half of your origami diamond.

10. Apply glue or repositionable double sided tape to each of the corners and stick the 2 halves together.

This is the tricky part so be patient. Start by lining up one corner and slowly work your way around. The repositionable tape did make it easier to line up all the sides and re-do them where they didnlt match up but I think a glue stick would've work just as well.

11. Thread some cotton through the top and hang or display in a bowl on your coffee table.

DIY ORIGAMI DIAMOND DECORATIONS

Ah, I'm so in love. I think they'd add a lovely, modern touch to any tree but I've left mine sitting on top of the fireplace for now.

Comment

Emma

Hi, I'm Emma.

I'm a crafter, blogger and paper enthusiast living in the North West of England.

Gathering Beauty is the place where I share craft tutorials and diy inspiration. I started this blog back in 2013 as a way of sharing all the things I love and make. I share paper crafts, clay crafts, origami, printables and desktop wallpapers as well as the odd crochet and weaving project. I hope you find something here that inspires you.